Post-Production Timeline and Export
Where Everything Comes Together
During your interview, InterviewCue was quietly working alongside you -- recording timestamps every time you clicked a question, pressed a hotkey, or added a note. The post-production timeline is where all of that captured data becomes useful. It's your complete record of what happened and when, and it's the foundation for chapter markers, show notes, edit points, and your final published episode.
If you followed the workflow in Your First Interview, you've already seen the post-production page briefly. This guide covers every feature in detail.
The Timeline
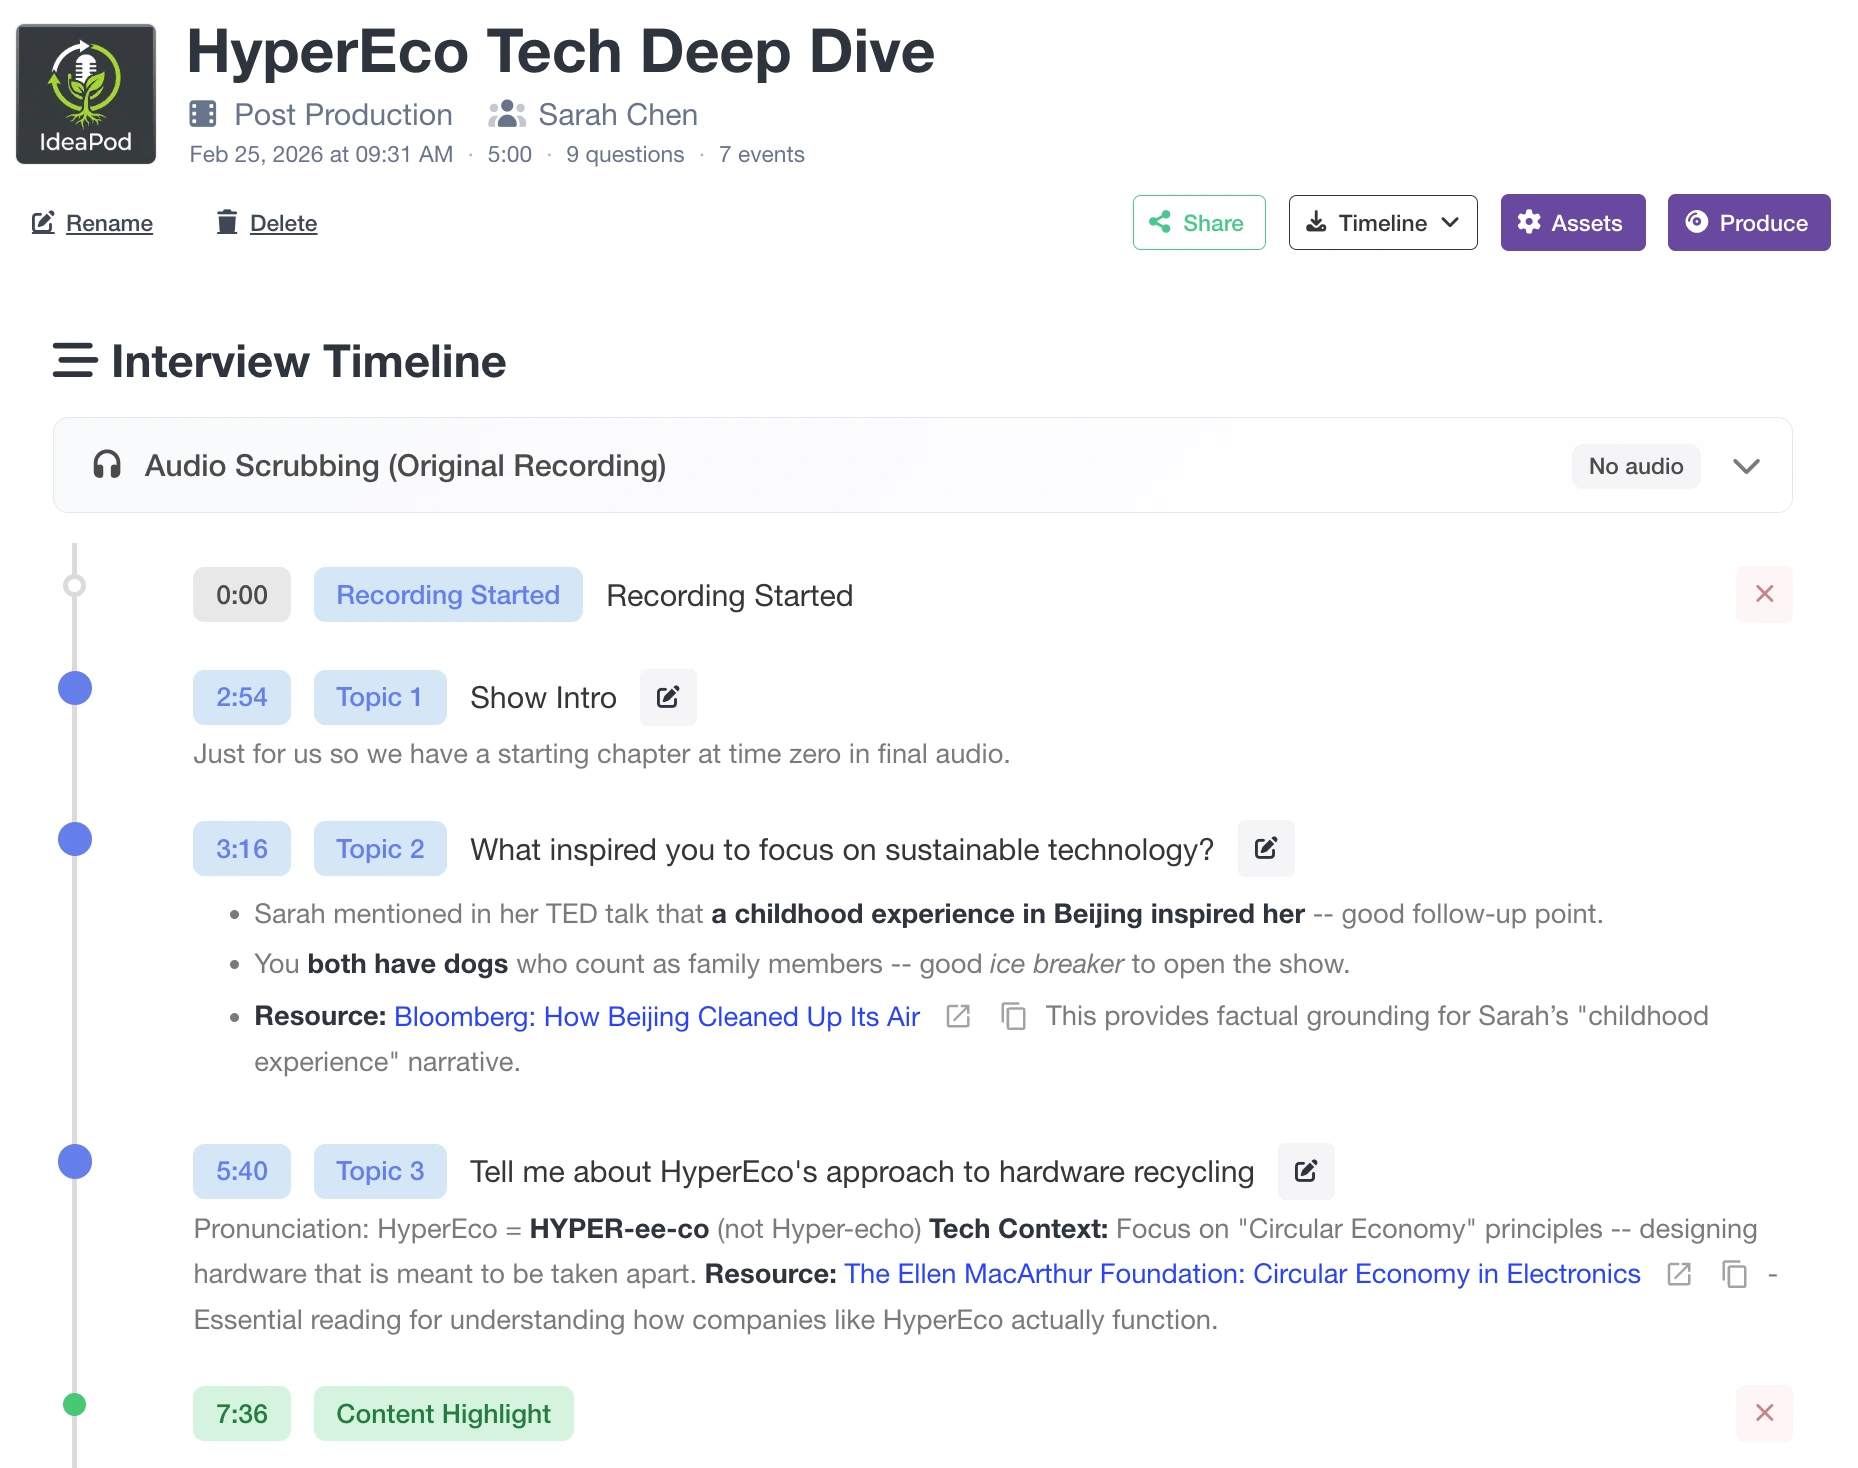
When you end an interview (or click Post-Production from the interview details page), you see your complete timeline in chronological order:
- Recording Started -- when the timer began
- Questions Begun -- when you moved into the structured interview
- Question events -- each question you clicked, with its timestamp
- Captured events -- every highlight, audio issue, segment, follow-up, note, and link you captured with hotkeys during the interview
- Interview Ended -- when you wrapped up
- Total duration -- the full length of the recording
Each entry shows its timestamp, event type (with color-coded icon), content, and action buttons for editing or deleting. Questions display with numbered topic badges so you can see the interview structure at a glance.
The header shows your interview name, guest, date, total duration, question count, and event count -- a quick snapshot of the session.
Managing Audio and Transcripts
The Manage Assets button opens a dialog where you upload audio recordings and transcripts for both your original and final versions. This is the central hub for all your media files.

The dialog has two sections:
- Original Recording -- your raw audio and its transcript (from Zoom, Riverside, Streamyard, etc.)
- Final Recording -- your edited, produced audio and its transcript
Each section has rows for audio and transcript files. You can browse for files, drag and drop them onto the appropriate section (InterviewCue auto-classifies by file type), or generate transcripts from uploaded audio. Configure everything you need across all four rows, then press Process -- InterviewCue handles uploads and transcript generation in sequence.
Why both versions? Your original recording is what you captured live -- the timestamps from your interview match this audio. Your final recording is the edited version you'll publish -- with intros trimmed, sections removed, music added, and content polished. The two rarely match so we need both.
Transcript Generation
When you upload audio, InterviewCue can automatically generate a WebVTT transcript from it. This happens in the background -- you'll get a notification when it's complete. If you already have a transcript from your recording platform (Zoom, Riverside, and others export WebVTT), you can upload that instead.
Auto-Alignment
With all assets in place, InterviewCue automatically runs our advanced alignment algorithm -- adjusting your original timestamps to match the final audio. You don't need to trigger this manually; it happens as soon as all assets are available. The shortest path is to upload first your original audio track right after you're done recording. Then when the final audio is ready, upload it and the app handles the rest.
Downloading Your Assets
Once uploaded, your audio and transcripts are available for download anytime from the post-production page -- for both the original and final versions. InterviewCue becomes a convenient home for your interview media, so you always know where to find the raw recording, the published audio, and the transcripts for any episode.
Storage note: On the Free plan, InterviewCue retains up to 250MB of audio with 3-month retention. As you upload new interviews, older audio files may be removed to stay within the limit. Pro and Team plans offer more storage that accumulates while subscribed. Transcripts and timeline data are always retained regardless of plan.
Audio Scrubbing
How do you know if a timestamp is accurate without listening to the audio? Yet, hunting through an hour of audio is very slow. Upload your recording and InterviewCue adds play buttons next to every timestamp in your timeline.
Verifying a Timestamp
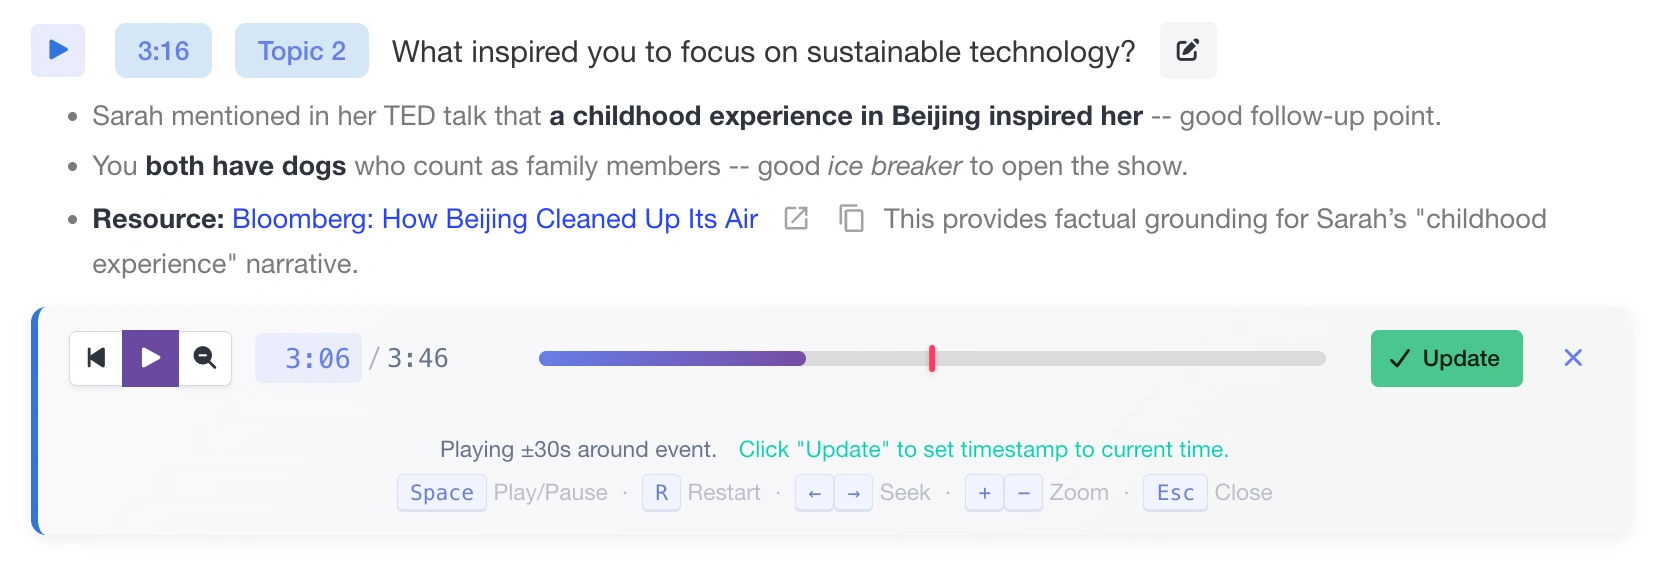
- Click the play button next to any event
- An inline scrubber panel opens directly below that event
- Audio plays a window around the event's timestamp so you can hear the context
- A red marker on the progress bar shows where the event is positioned
- The time display is color-coded: blue before the event, green at the event, orange after it
Updating a Timestamp
Found the exact moment? Press Update and the event's timestamp jumps to your current playback position. The scrubber closes and the timeline updates immediately.
Scrubber controls:
- Play/Pause and Restart buttons
- Zoom toggle -- switch between a tight window (±30 seconds) or a wider view (±5 minutes) around the event
- Keyboard shortcuts -- Space to play/pause, arrow keys to seek ±2 seconds, R to restart, +/- to zoom in/out, Escape to close
Which Audio?
The scrubber automatically uses the right audio file for whichever timeline you're viewing -- raw audio for the original timeline, final audio for the finalized timeline. You can upload audio for one or both.
Timeline Alignment
Your original timestamps are perfectly synced to your raw recording -- but your published audio is different. You trimmed the intro, cut out a tangent, added music, removed dead air. The timestamps no longer match.
InterviewCue's advanced alignment algorithm solves this automatically. Given both versions of your audio, it maps your original timestamps to the correct positions in your final recording. The result is an adjusted timeline where every question, highlight, and chapter marker points to the right moment in the audio your audience will hear.
The algorithm handles the common realities of audio editing -- removed sections, shifted segments, added intros and outros -- and produces high-confidence results for the vast majority of events. For the occasional edge case, audio scrubbing lets you verify and fine-tune individual timestamps with a few clicks.
Raw and Finalized Timelines
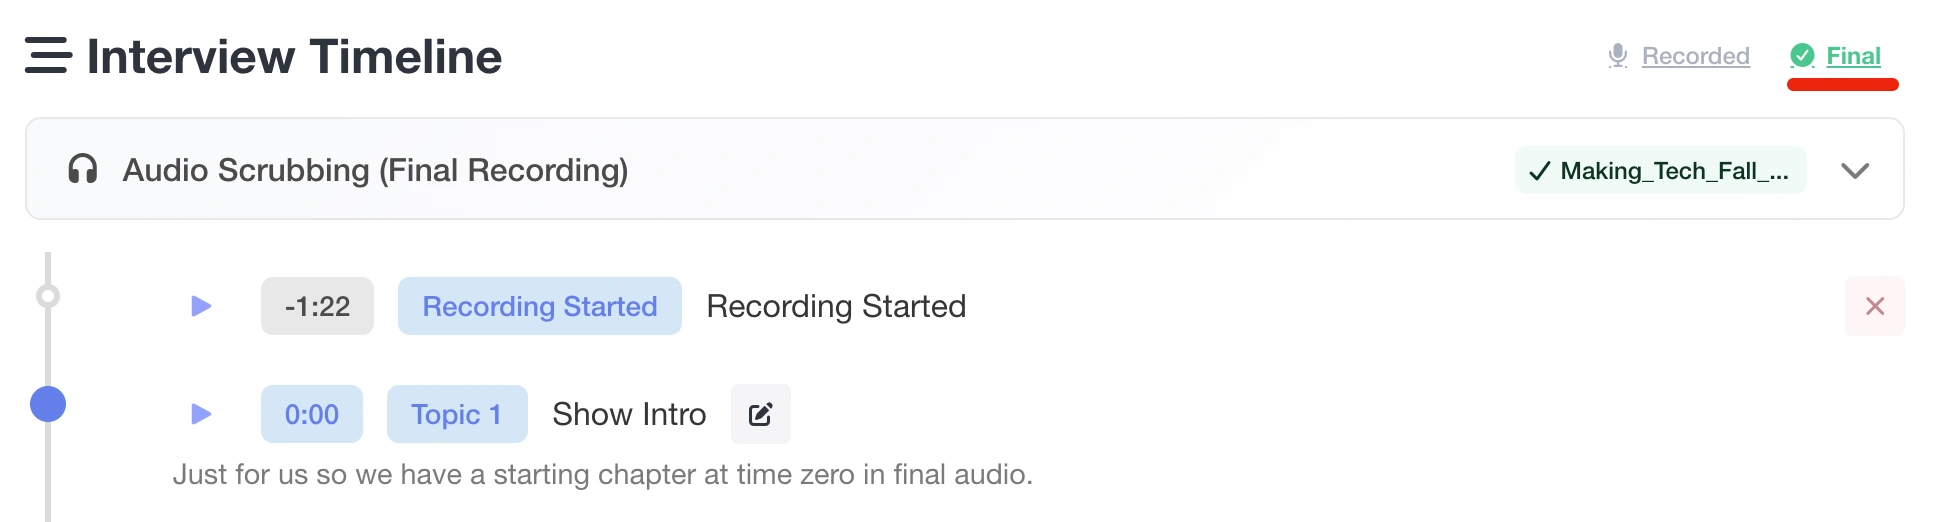
Once transcript alignment has run, your post-production page shows two timeline views with toggle buttons at the top:
- Raw -- your original timestamps exactly as captured during the live interview
- Finalized -- timestamps adjusted to match your final, edited audio
Both are preserved. The raw timeline is your source of truth -- it's what actually happened during the recording. The finalized timeline is what you'll export for chapter markers, show notes, and your published episode.
You can switch between views at any time. Each view has its own audio scrubbing (raw audio for the raw timeline, final audio for the finalized timeline), so you can verify timestamps against the correct recording.
Default behavior: If an adjusted timeline exists, InterviewCue shows the finalized view by default -- since that's what you'll most likely be working with for export and production.
Editing Your Timeline
Inline Timestamp Editing
Click any timestamp in the timeline to edit it directly. An input field appears with the current time -- type the corrected time in MM:SS format and press Enter to save, or Escape to cancel. If the new time changes the event's position in the chronological order, the page reloads to show the correct sequence. Otherwise, the update happens instantly in place.
You can edit timestamps on both the raw and finalized timelines. Changes to finalized timestamps are tracked separately and won't affect your raw timeline.
Editing Event Text
Click the edit button (pencil icon) on any event to modify its text. This is useful for refining chapter titles, adding detail to quick captures, or clarifying notes you jotted down mid-interview.
Renaming Questions
Questions can be renamed directly from the timeline. Since question text becomes chapter titles in your exports, it's worth making these clear and descriptive for your audience.
Deleting Events
Click the delete button (trash icon) on any event to remove it. A confirmation dialog prevents accidental deletions. Common reasons to delete: duplicate captures, misfired hotkeys, or events you no longer need.
Converting Events to Questions
During live interviews, unplanned topics often emerge. You might have captured these moments as segment markers, follow-ups, or notes -- but those are timeline events, not questions. They won't become chapters in your exports.
Converting an event to a question promotes it to a first-class chapter that appears in CUE sheets, EDL exports, show notes, and your produced MP3's chapter list.
How to Convert
- Find the event in your timeline (segment marker, follow-up, or note)
- Click the up arrow button (↑) next to it
- In the dialog, enter a question/topic title -- this becomes the chapter name
- Optionally add background info for context
- The "Remove original event" checkbox is on by default to keep your timeline clean
- Click Convert to Question
The new question is inserted at the correct chronological position based on when the original event occurred. If the event had text (a note or follow-up), the dialog pre-fills the title to save you time.
Which events can be converted? Segment markers, custom notes, and follow-ups -- these represent content topics. Technical markers like audio issues and flow interruptions can't be converted since they don't represent chapter-worthy content.
Adding New Topics
Sometimes you'll discover important moments while reviewing your recording that weren't marked during the interview -- perhaps you were fully engaged in the conversation and forgot to press a hotkey.
Click Add Topic at the bottom of the timeline to create a new question after the fact:
- Enter the time in MM:SS or HH:MM:SS format
- Enter a question/topic title
- Optionally add background info
- Click Add Topic
The new topic is inserted at the correct chronological position and appears as a chapter in all exports. Use audio scrubbing to find the exact timestamp before adding.
Note: Add Topic is available on the raw timeline only, ensuring topics are added to your source timeline and properly included in any future alignment.
Sharing Your Timeline
Want your producer, editor, or co-host to review the timeline? Click Share to generate a unique, secure link. Anyone with the link can view your complete timeline, download all eight export formats, and access your uploaded audio and transcripts -- no account required. You can revoke access at any time.
See Sharing Interviews for the full guide.
Exporting Your Timeline
Click the Export dropdown to download your timeline in any of eight professional formats:
| Format | Best For |
|---|---|
| Markdown (Timeline) | Full timeline with timestamps, events, and links -- great for internal reference |
| Markdown (Show Notes) | Listener-facing format with questions only, no internal events or timestamps |
| JSON | Structured data for custom tools and automation |
| CSV | Adobe Audition marker import |
| Printable timeline with color-coded event dots | |
| DaVinci Resolve EDL | Edit Decision List with SMPTE timecodes and color-coded markers |
| Logic Pro MIDI | Marker events for Logic Pro |
| CUE Sheet | Chapter markers for MP3 embedding |
If you have both raw and finalized timelines, you can export from either view. For publishing, you'll almost always want the finalized timestamps.
All export formats are also available through share links, so your editor or producer can download exactly what they need.
See Export Formats for complete details and examples of each format.
Producing Your Final Episode
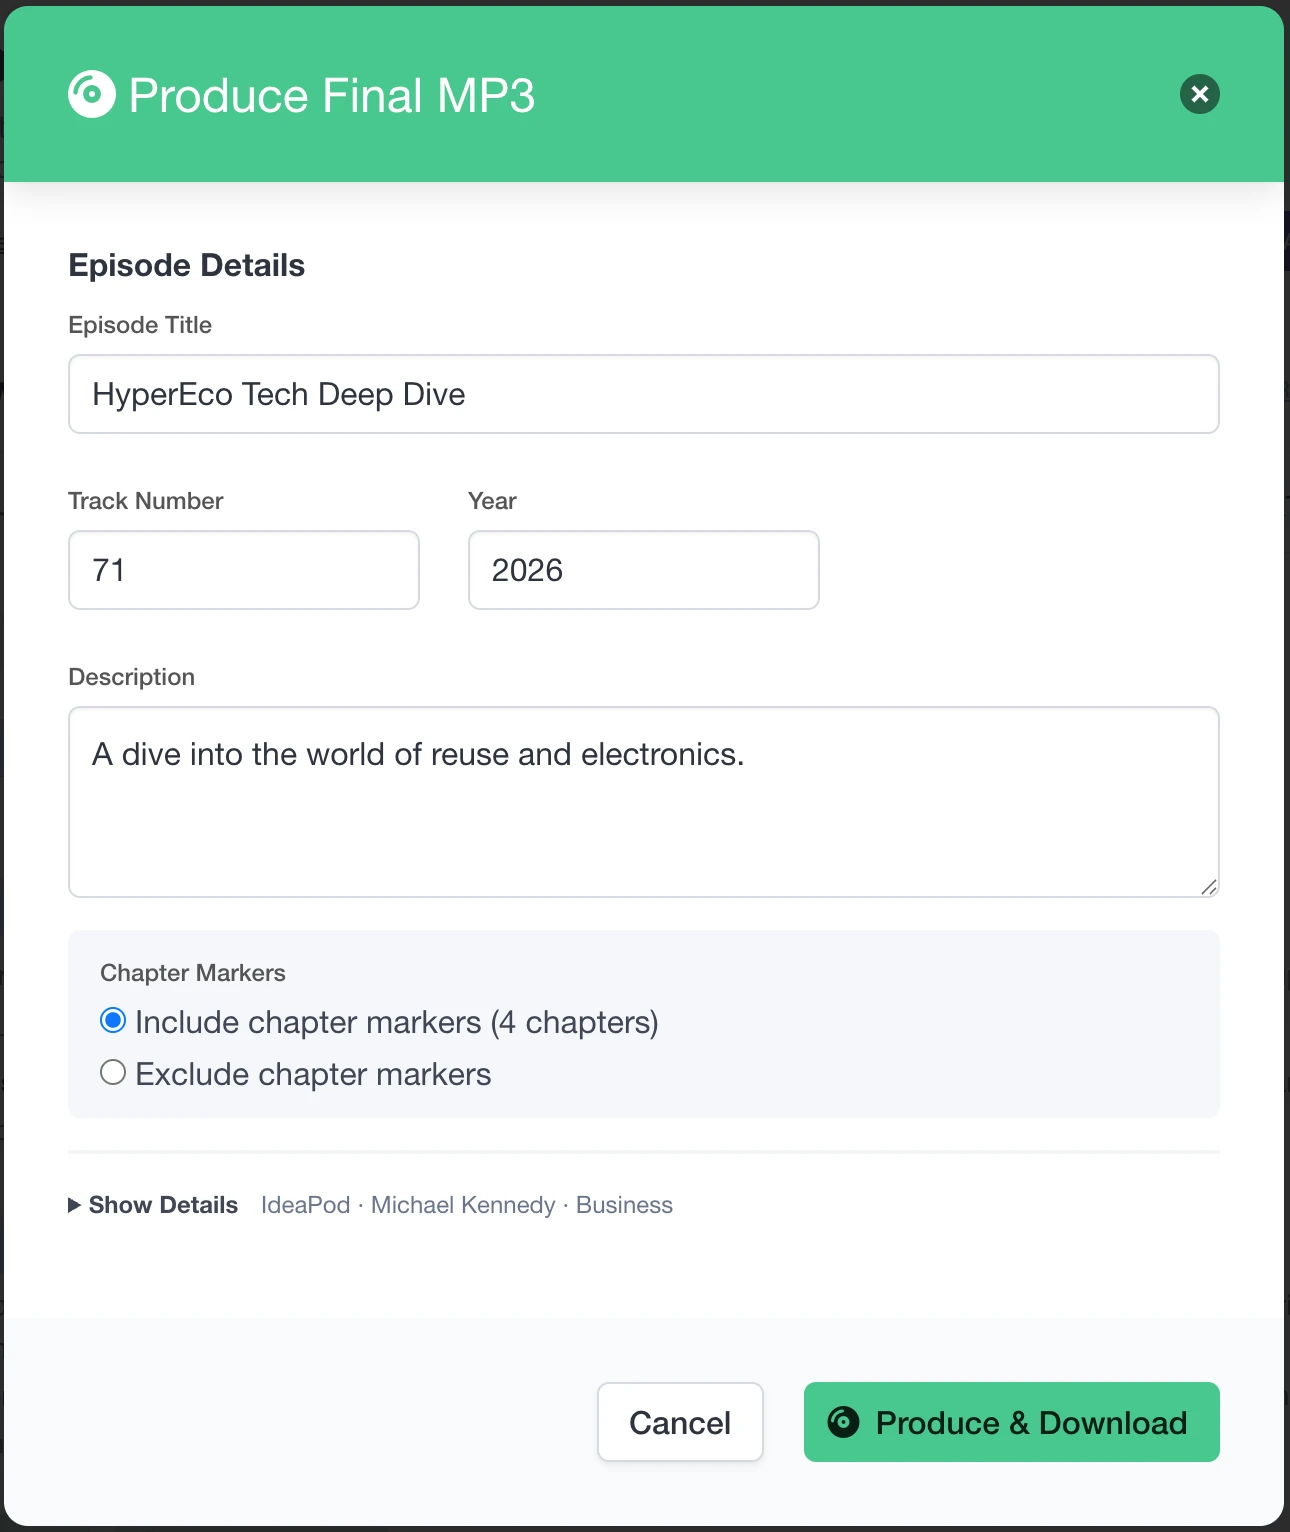
The Produce button is the final step -- it takes your final audio and embeds everything your podcast needs into a single, ready-to-publish MP3.
What Gets Embedded
- ID3v2.4 metadata -- title, artist, album (show name), track number, year, description, genre, language, publisher, copyright, and URL
- Chapter markers -- derived from your finalized timeline's questions, so listeners can jump between topics in their podcast app (if enabled in at time of production)
- Cover art -- pulled from your show's artwork
- Industry-standard encoding -- 44.1kHz, 128 kbps mono, the exact spec podcast apps expect
Requirements
Producing requires two things: a show assignment (so InterviewCue knows which show metadata to embed) and final audio (uploaded via Manage Assets). If either is missing, the dialog guides you through setting them up.
The Result
Press Produce and InterviewCue builds your tagged MP3 and downloads it automatically. The file is ready to upload to your podcast host -- chapters, artwork, metadata, and all.
Tips for Post-Production
Review soon after recording -- while the interview is fresh, add missing events, clarify vague notes, and improve chapter titles. Context you remember now will be hard to reconstruct later.
Capture liberally, edit in post -- it's easier to delete an extra marker than to reconstruct a missed timestamp. If you over-captured during the interview, just delete what you don't need.
Use audio scrubbing for critical timestamps -- chapter markers and highlights are worth verifying with audio. General notes and follow-ups are fine with approximate timing.
Work from finalized -- once transcript alignment has run, do your polishing on the finalized timeline. That's what your audience will experience.
What's Next?
Export Formats - Complete details and examples for all eight export formats
Collaborative Live Mode - Deep dive into multi-host and guest collaboration
Your First Interview - See the complete journey from idea to published episode