Creating and Managing Interviews
Your Interview Dashboard
The Interviews page is your home base in InterviewCue. Every interview you've created lives here, sorted by most recently modified. At the top you'll find three action buttons -- Join (to enter a collaborative session), Create (to build an interview from scratch), and Import (to create one from a markdown file) -- along with a powerful search bar that filters across your entire library.
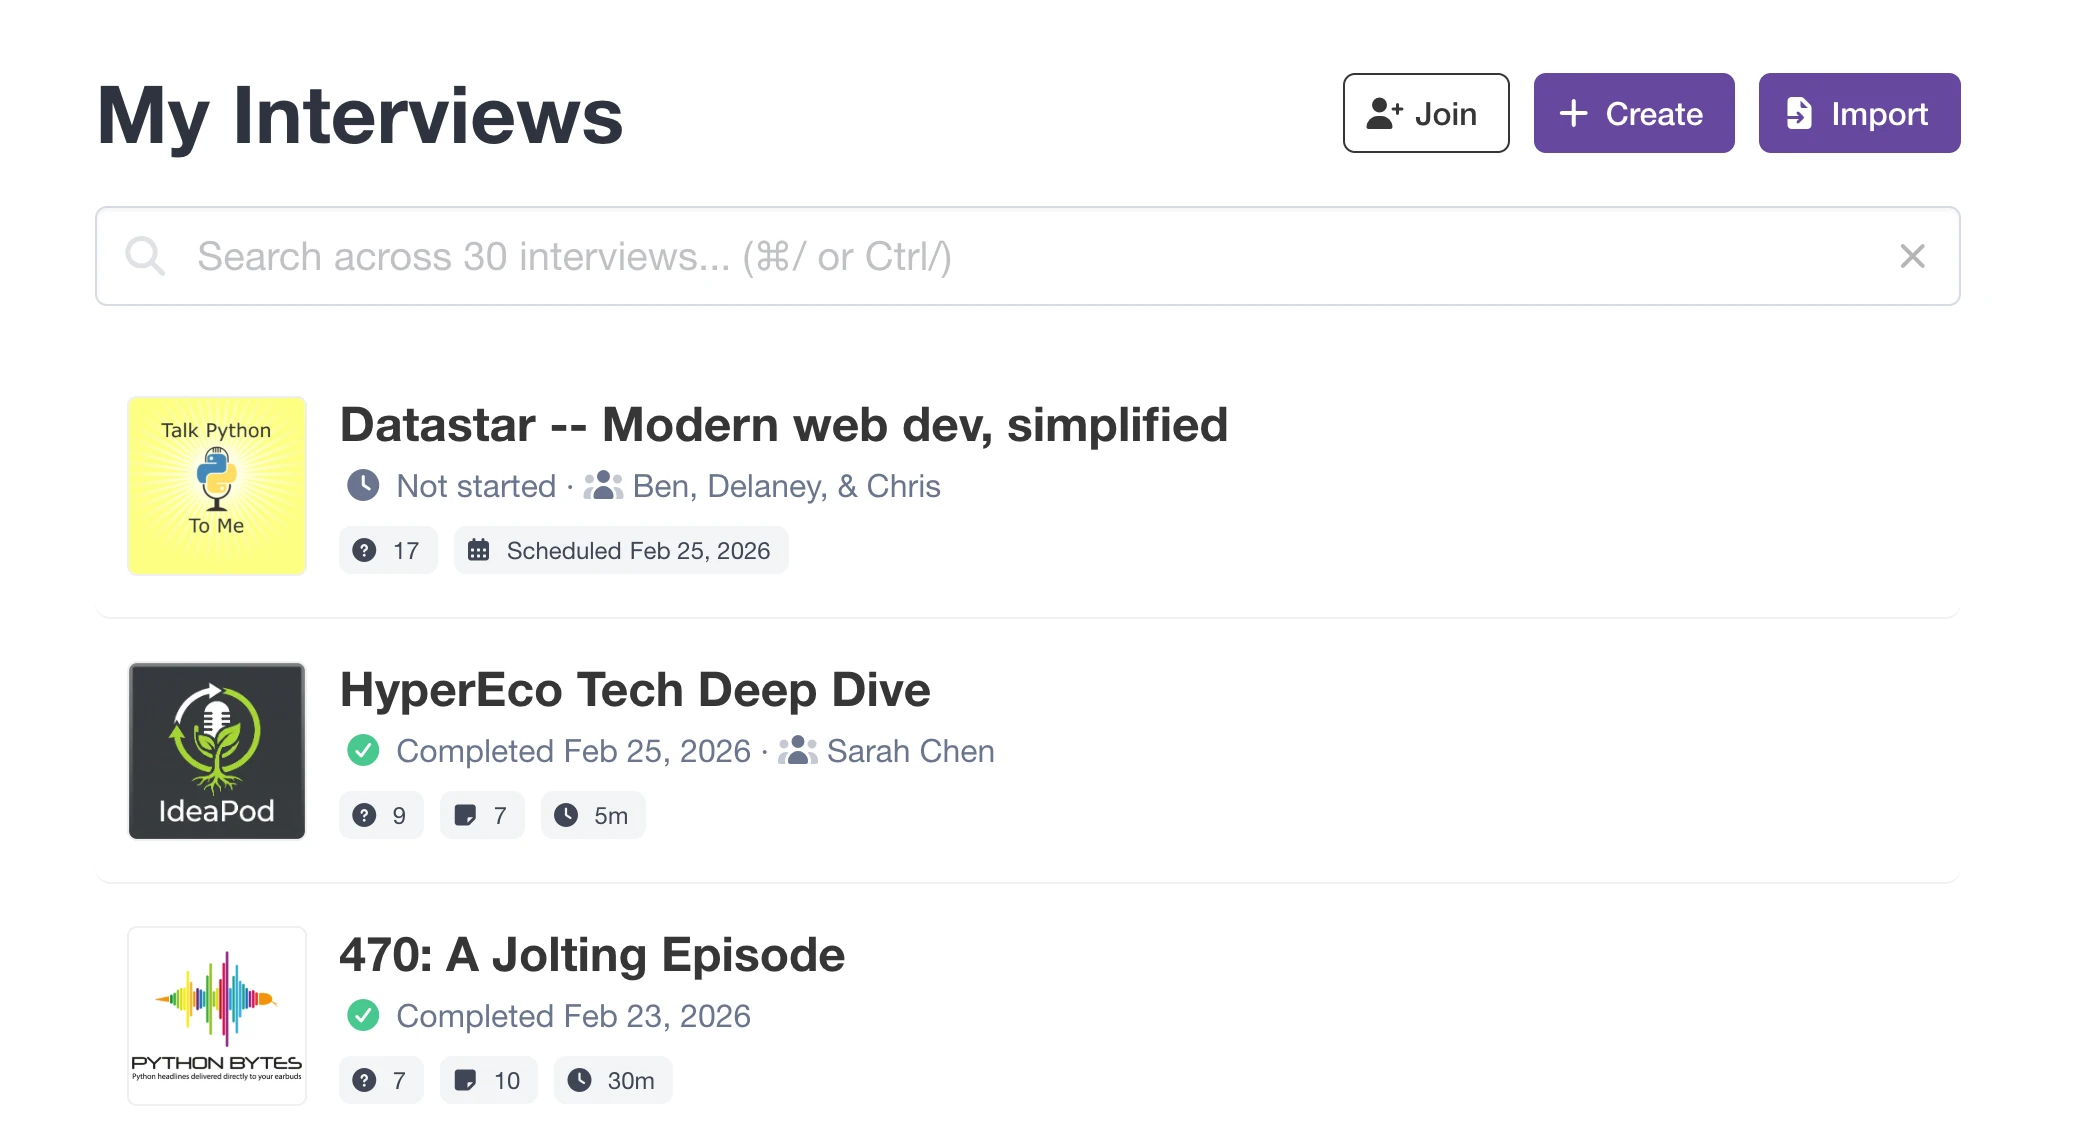
Each interview card gives you a quick snapshot of where things stand:
- Show Artwork -- the album art thumbnail from the associated show, if one is linked
- Interview Title -- the name you gave it
- Status Badge -- color-coded: Not Started (clock icon), In Progress (blue spinner), or Completed (green check with date)
- Guest Name -- the interviewee, if provided
- Question & Notes Count -- how many questions you've prepared and notes captured
- Duration -- total interview time (for completed interviews)
- Scheduled or Modified Date -- when the interview is planned, or when you last touched it
Creating Interviews
There are two ways to create interviews in InterviewCue. The recommended approach is Markdown Import -- it integrates naturally with collaborative tools like Google Docs or Notion where the best interview prep tends to happen. The alternative is Quick Create, for building an interview directly in the app.
The Recommended Way: Markdown Import
The most effective interview workflow starts outside InterviewCue, in a tool designed for brainstorming and collaboration. Write your outline in Google Docs, Notion, or any tool that can export markdown. Share it with your guest so they can add context and talking points. Then bring the polished result into InterviewCue with a simple drag-and-drop.
This workflow is covered step-by-step in Your First Interview, but here's the quick version:
- Write your outline in Google Docs or a similar tool -- use H1 for the title, H2 for each question, and regular text for background notes
- Export as markdown -- in Google Docs, choose File > Download > Markdown (.md)
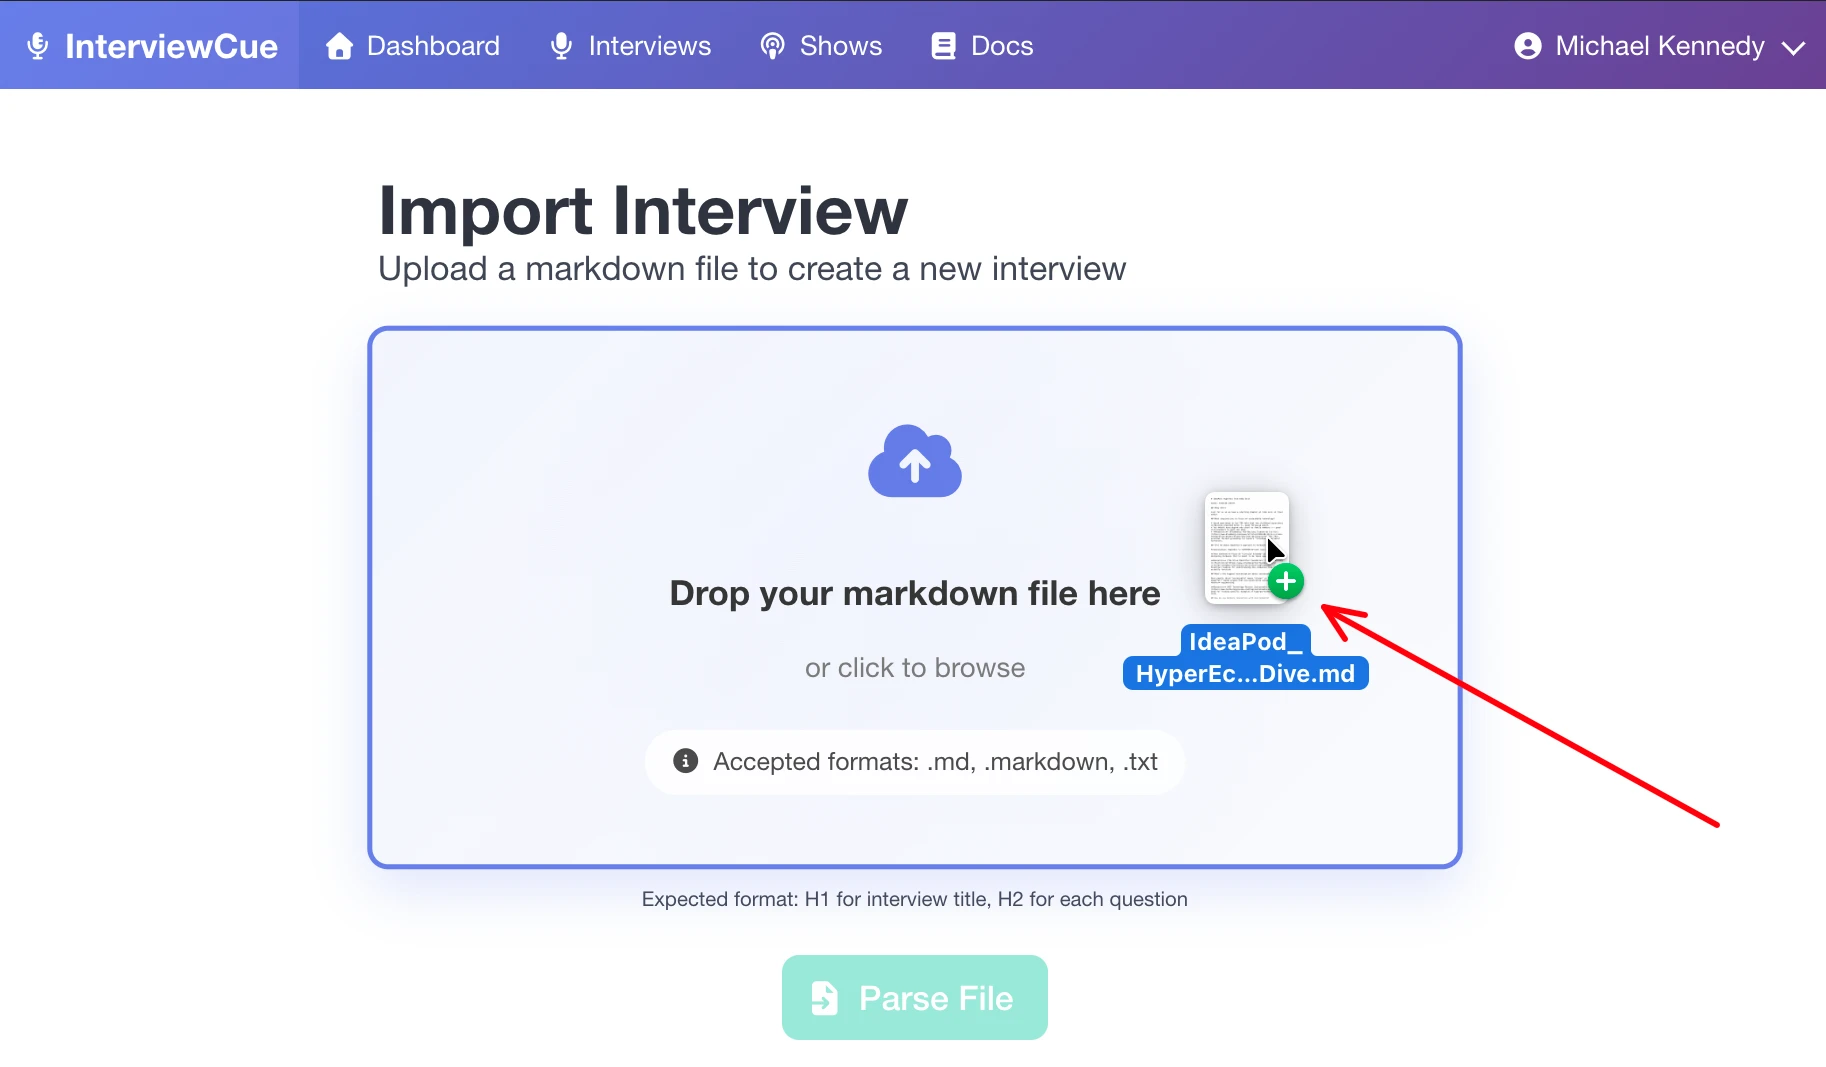
- Import into InterviewCue -- visit Interviews > Import, drag your
.mdfile onto the drop zone, and press Parse File - Review the preview -- verify your title, questions, and background notes parsed correctly
- Set metadata -- choose an associated show and optional scheduled date
- Press Create Interview -- done!
The import expects a straightforward structure:
# Interview Title

## First Question
Background information for this question, including any [reference links](https://example.com).

## Second Question
More background info here.

## Links
- [Resource Name](https://example.com)
- https://another-example.com
A downloadable template is available right on the import page to get you started. Links embedded in question background text are automatically extracted and associated with the relevant question, so you can reference materials right where they're needed.
Why this workflow wins: By starting in a collaborative tool, you can share the outline with your guest before the interview. They add context, correct details, and come in more prepared -- all without needing an InterviewCue account. When it's time to record, import the final version and you're ready to go. See Your First Interview for the full walkthrough with screenshots and tips.
Quick Create
If you prefer to build your interview directly in InterviewCue -- or want to stub out a quick interview and refine it later:
- Click the Create button on your dashboard
- Enter an interview title (required)
- Optionally fill in the guest name, associated show, and scheduled date
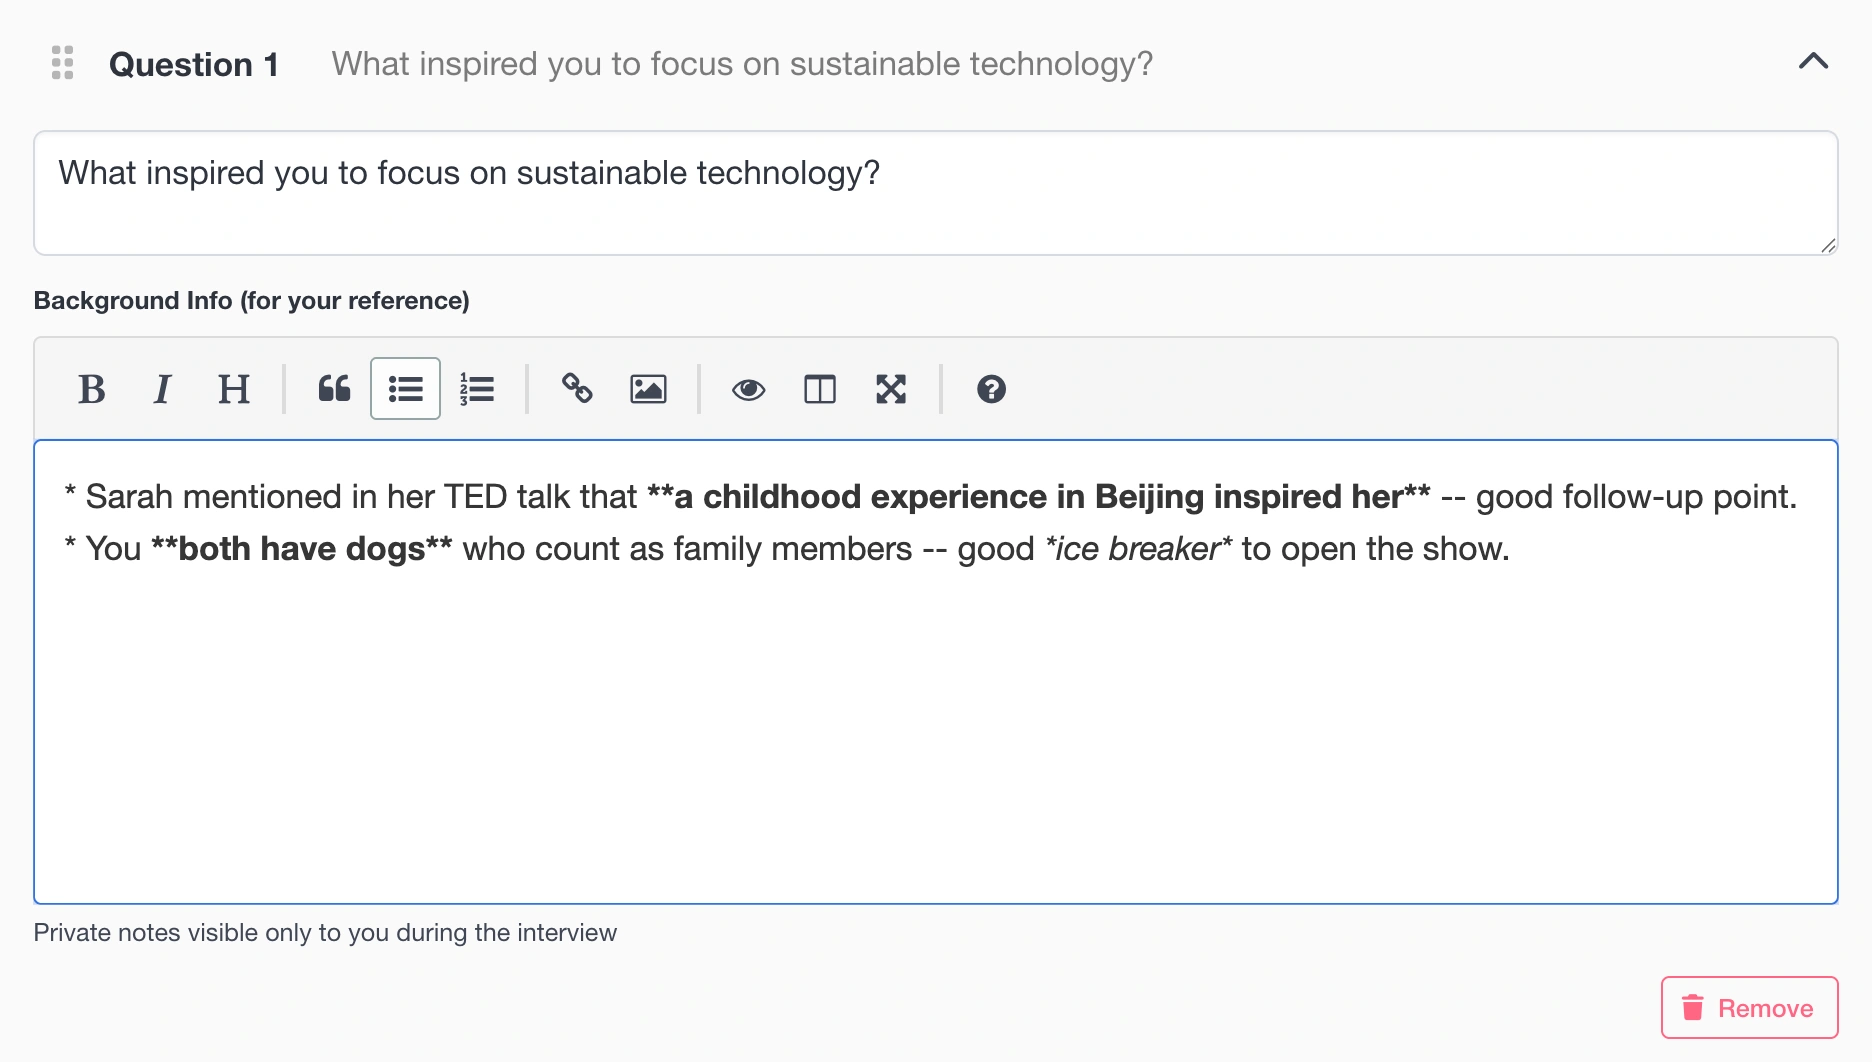
- Add questions with the Add Question button -- each has a title field and an optional background information area
- Add reference links with the Add Link button
- Press Create Interview
The built-in editor supports full markdown formatting in both question text and background information. You can reorder questions by dragging their handles, and collapse or expand individual questions to keep your focus. Quick Create works well for one-off interviews where you don't need external collaboration, or when you want to get something started quickly before fleshing it out.
Smart Link Filtering
When you import interviews from markdown -- especially from show notes or research documents -- they often carry boilerplate links: social media profiles, promotional URLs, generic company pages. These clutter your reference list without adding value to the actual conversation.
InterviewCue's Smart Link Filtering lets you permanently exclude these repetitive URLs. On the interview edit page, each link has an Exclude button (🚫 icon). Click it once, and that URL is automatically filtered out of all future imports.

Your first import might come in with dozens of links including Twitter, LinkedIn, and company homepages mixed in with the genuinely useful references. After excluding the noise once, subsequent imports arrive clean -- only the topic-relevant resources you actually want during the interview.
Links are normalized before comparison, so https://google.com and http://www.google.com are treated as the same URL. Your exclusion list is personal to your account. You can review and manage your excluded links at any time from the account settings.
Refining Your Interview
Whether you imported from markdown or built from scratch, you can always edit and refine your interview before recording. Click Edit on the interview details page to open the full editor.
The editor gives you:
- Rich markdown editing for question text and background information, with a toolbar and keyboard shortcuts
- Drag-and-drop reordering of questions via drag handles
- Collapsible question cards so you can focus on one at a time, or expand all for a bird's eye view
- Link management -- add, remove, reorder, or exclude reference links
- Show association -- assign or change the associated show
- Scheduled date -- set or update when the interview is planned
Important: Editing is available only before you start the interview. Once you press Start Interview, the questions are locked so that event timing stays consistent throughout the recording. Make sure your questions and background notes are finalized before recording day.
The Interview Details Page
Click any interview on your dashboard to open its details page -- the central hub for everything about that interview.
At a Glance
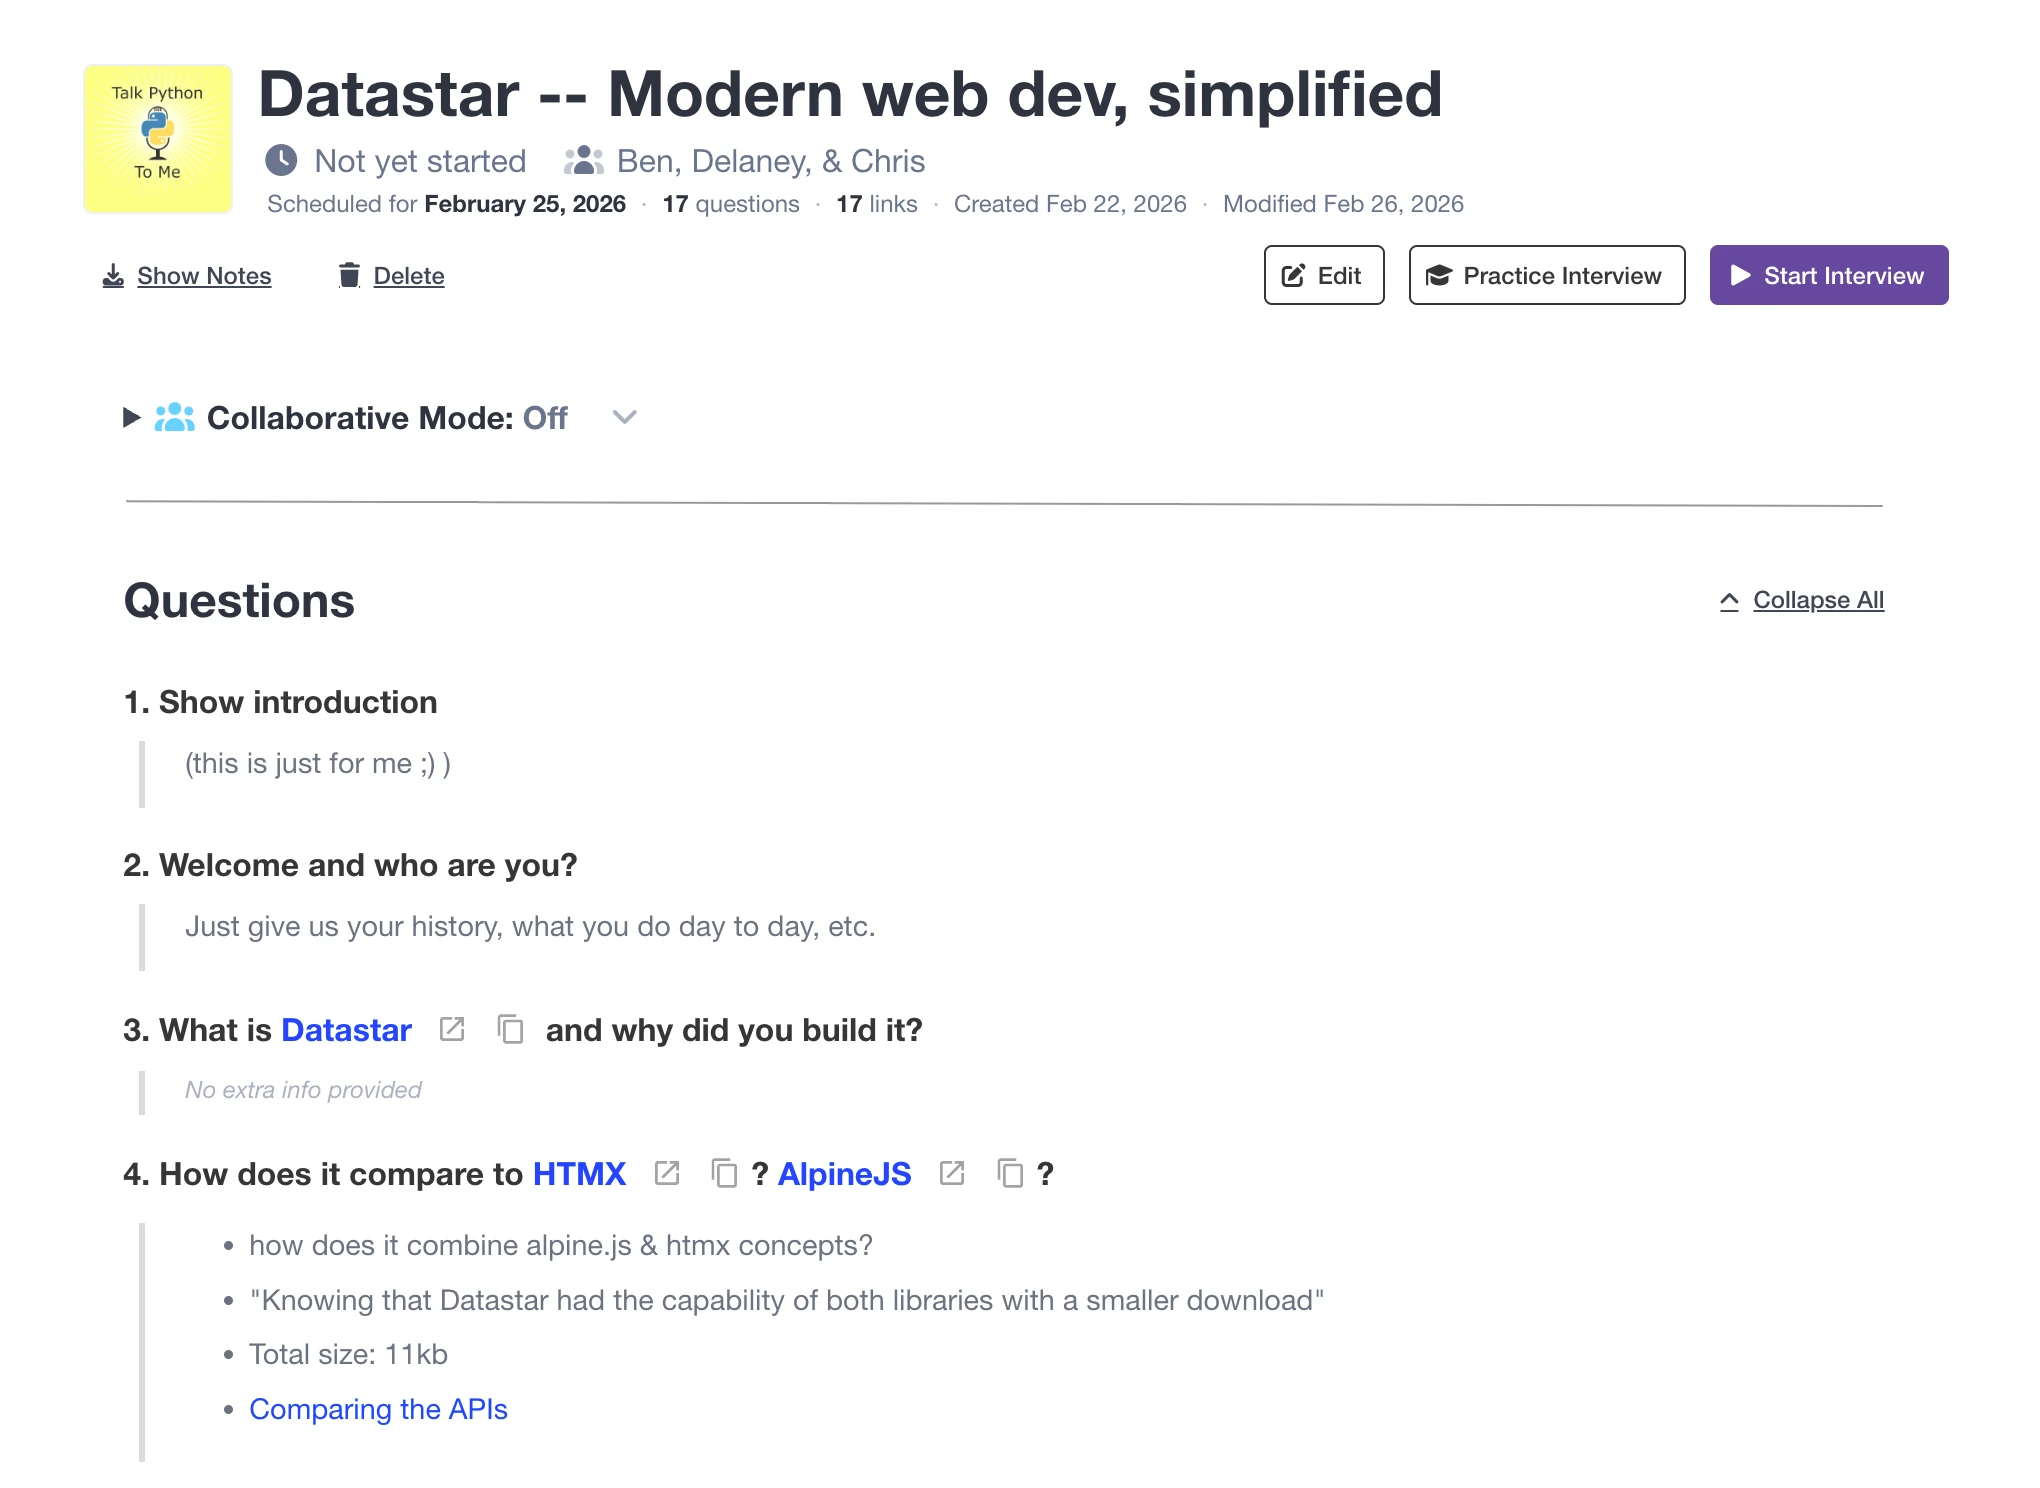
The header shows your interview title, guest name (if provided), and status with timestamps. Below that, key metadata tells you what you need to know:
- 📝 Question count -- how many questions you've prepared
- 🎯 Event count -- how many events were captured during recording
- 🔗 Link count -- how many reference links are attached
- ⏱️ Duration -- total recording time (for completed interviews)
- 📅 Scheduled, created, and modified dates
Actions
What you can do depends on where the interview is in its lifecycle:
Before recording:
- Edit -- modify questions, background notes, links, and metadata
- Practice Interview -- rehearse the interview without recording any data
- Start Interview -- begin the live session
- Show Notes -- export a quick summary of questions and links
During recording:
- Resume Interview -- return to the active live session
- Cancel Interview -- stop and discard the recording session (with confirmation)
After recording:
- Post Production -- jump to the post-production timeline for editing, exporting, and producing your final audio
Always available:
- Delete -- permanently remove the interview (with confirmation)
Collaborative Mode
If you're working with a co-host, producer, or guest, the details page includes a Collaborative Mode section. Enable it to generate a share code that others can use to join the session at the Join page. You can also enable Guest Access separately -- giving your guest a follow-along view with the background information visible to help them stay sharp and on point.
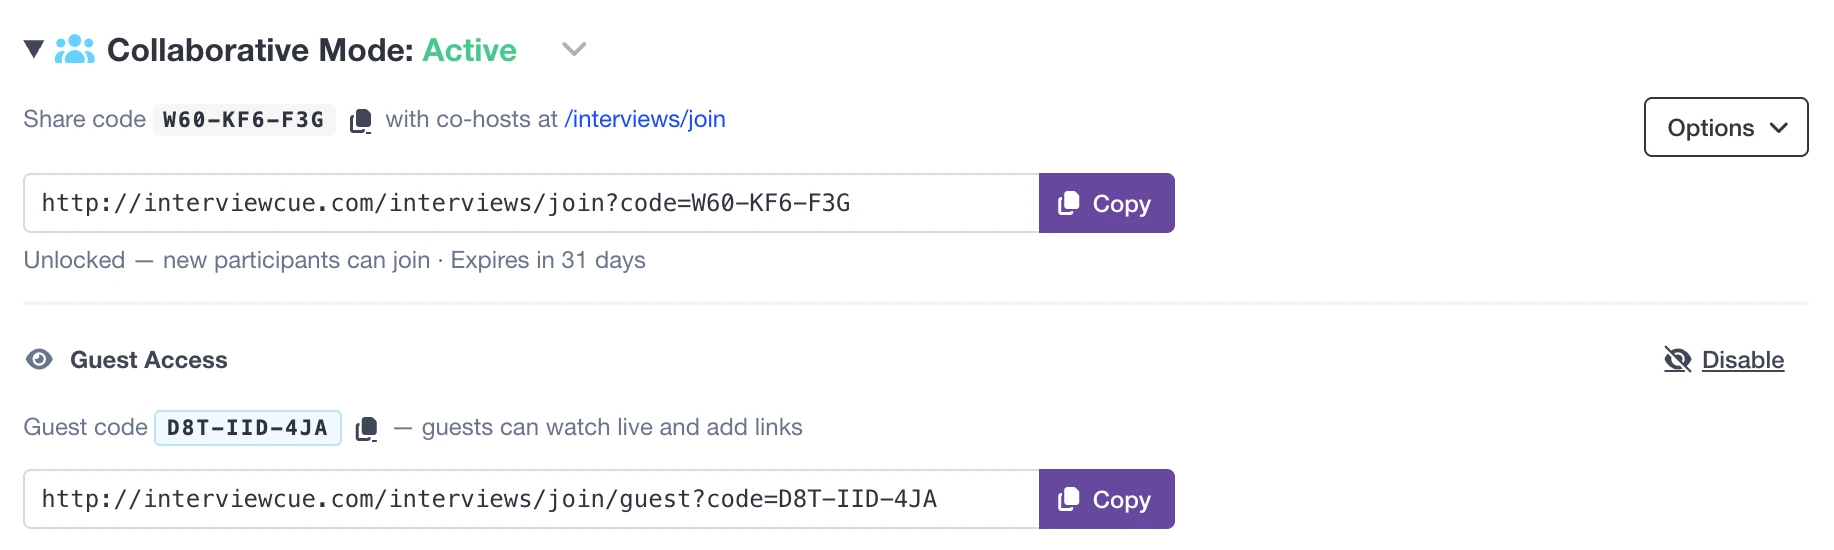
Collaborative sessions can be locked to prevent new participants, reset to clear timing, or disabled entirely. Sessions expire after 31 days of inactivity.
Learn more about real-time collaboration in Live Interview Mode.
Questions and Reference Links
All your questions appear in collapsible cards -- expand any question to see its background information. Below the questions, reference links are grouped by their associated question, with an Additional Resources section for links not tied to a specific topic.
From here you can:
- 📋 Copy Links as markdown for instant show notes creation
- 🔗 Open in Tabs to launch all reference links in a new browser window, with options for topic separators between groups
The Open in Tabs feature connects to InterviewCue's Link Opener tool, which is especially valuable during video interviews where you want to share screens around specific topics. See Your First Interview for more on this workflow.
Searching Your Library
As your interview library grows, search becomes essential. InterviewCue's search is instant, comprehensive, and always available at the top of your dashboard.
Start typing and results filter in real-time as you type. A counter shows how many interviews match ("Showing 3 interviews of 47 total"). Clear your search with the × button or press Escape.
Keyboard shortcut: Press ⌘/ or ⌘K (Mac) or Ctrl+/ or Ctrl+K (Windows/Linux) to jump to the search box from anywhere on the page.
What Gets Searched
The search looks across everything associated with your interviews:
- Interview titles -- the name you gave it
- Guest names -- the interviewee
- Question text -- all your prepared questions
- Background notes -- the private details behind each question
- Reference links -- link names and URLs
- Captured notes -- highlights, follow-ups, and other events from recording
- Show names -- the podcast or program an interview belongs to
- Host names -- hosts from associated shows
Example: Searching for "sustainable" finds interviews titled "Sustainable Tech Innovation," questions that mention sustainability, background notes referencing sustainable practices, and any show with "sustainable" in its name -- all in one search.
Search Tips
- Partial words work -- "sustain" finds "sustainable"
- Case insensitive -- "TECH" and "tech" return the same results
- Multiple words -- the entire phrase is matched as a substring
- Search by guest -- find all interviews with a particular person
- Search by show -- quickly pull up every episode of a podcast series
Organizing with Shows
Shows are the recommended way to organize your interviews into logical groups -- one show per podcast series, recurring program, or interview category.
When you associate interviews with a show, you get:
- 🎨 Visual identification -- the show's artwork appears on interview cards for instant recognition
- 🔍 Searchable grouping -- search by show name or host name to find all related interviews at once
- 📋 Consistent metadata -- show-level hosts and branding carry through to your interviews
Create shows from Shows in the navigation, then select the show when creating or editing any interview.
Learn more in Managing Shows.
Deleting Interviews
To delete an interview, open its details page and click Delete. A confirmation dialog makes sure you don't accidentally remove something important.
⚠️ Deletion is permanent. Everything associated with the interview is removed:
- All questions and background notes
- All captured events and timestamps
- Reference links
- Transcripts and audio assets (if uploaded)
- Share links (they'll stop working)
Make sure you've exported anything you need before deleting. There is no undo.
What's Next?
Now that you know how to create and manage your interview library:
Your First Interview - Walk through the complete journey from idea to published episode
Managing Shows - Organize interviews into shows with consistent branding
Preparing Questions - Craft effective questions with rich background notes
Reference Links - Add URLs for quick access during interviews
Live Interview Mode - Start conducting interviews with confidence