Conducting Interviews in Live Mode
The Heart of InterviewCue
Live Mode is where all your preparation comes together. Your questions and background notes become a focused, scrollable document. Your reference links are a tap away. And every time you advance to a new question or press a hotkey, InterviewCue silently records the timestamp -- building a rich timeline that becomes chapters, edit points, and show notes in post-production.
The entire interface is designed around one principle: stay present with your guest. Everything you need is visible, and everything you capture takes two to three seconds at most.
Starting the Interview
From the interview details page, click Start Interview. You'll see a screen ready for you to sync with your recording software.
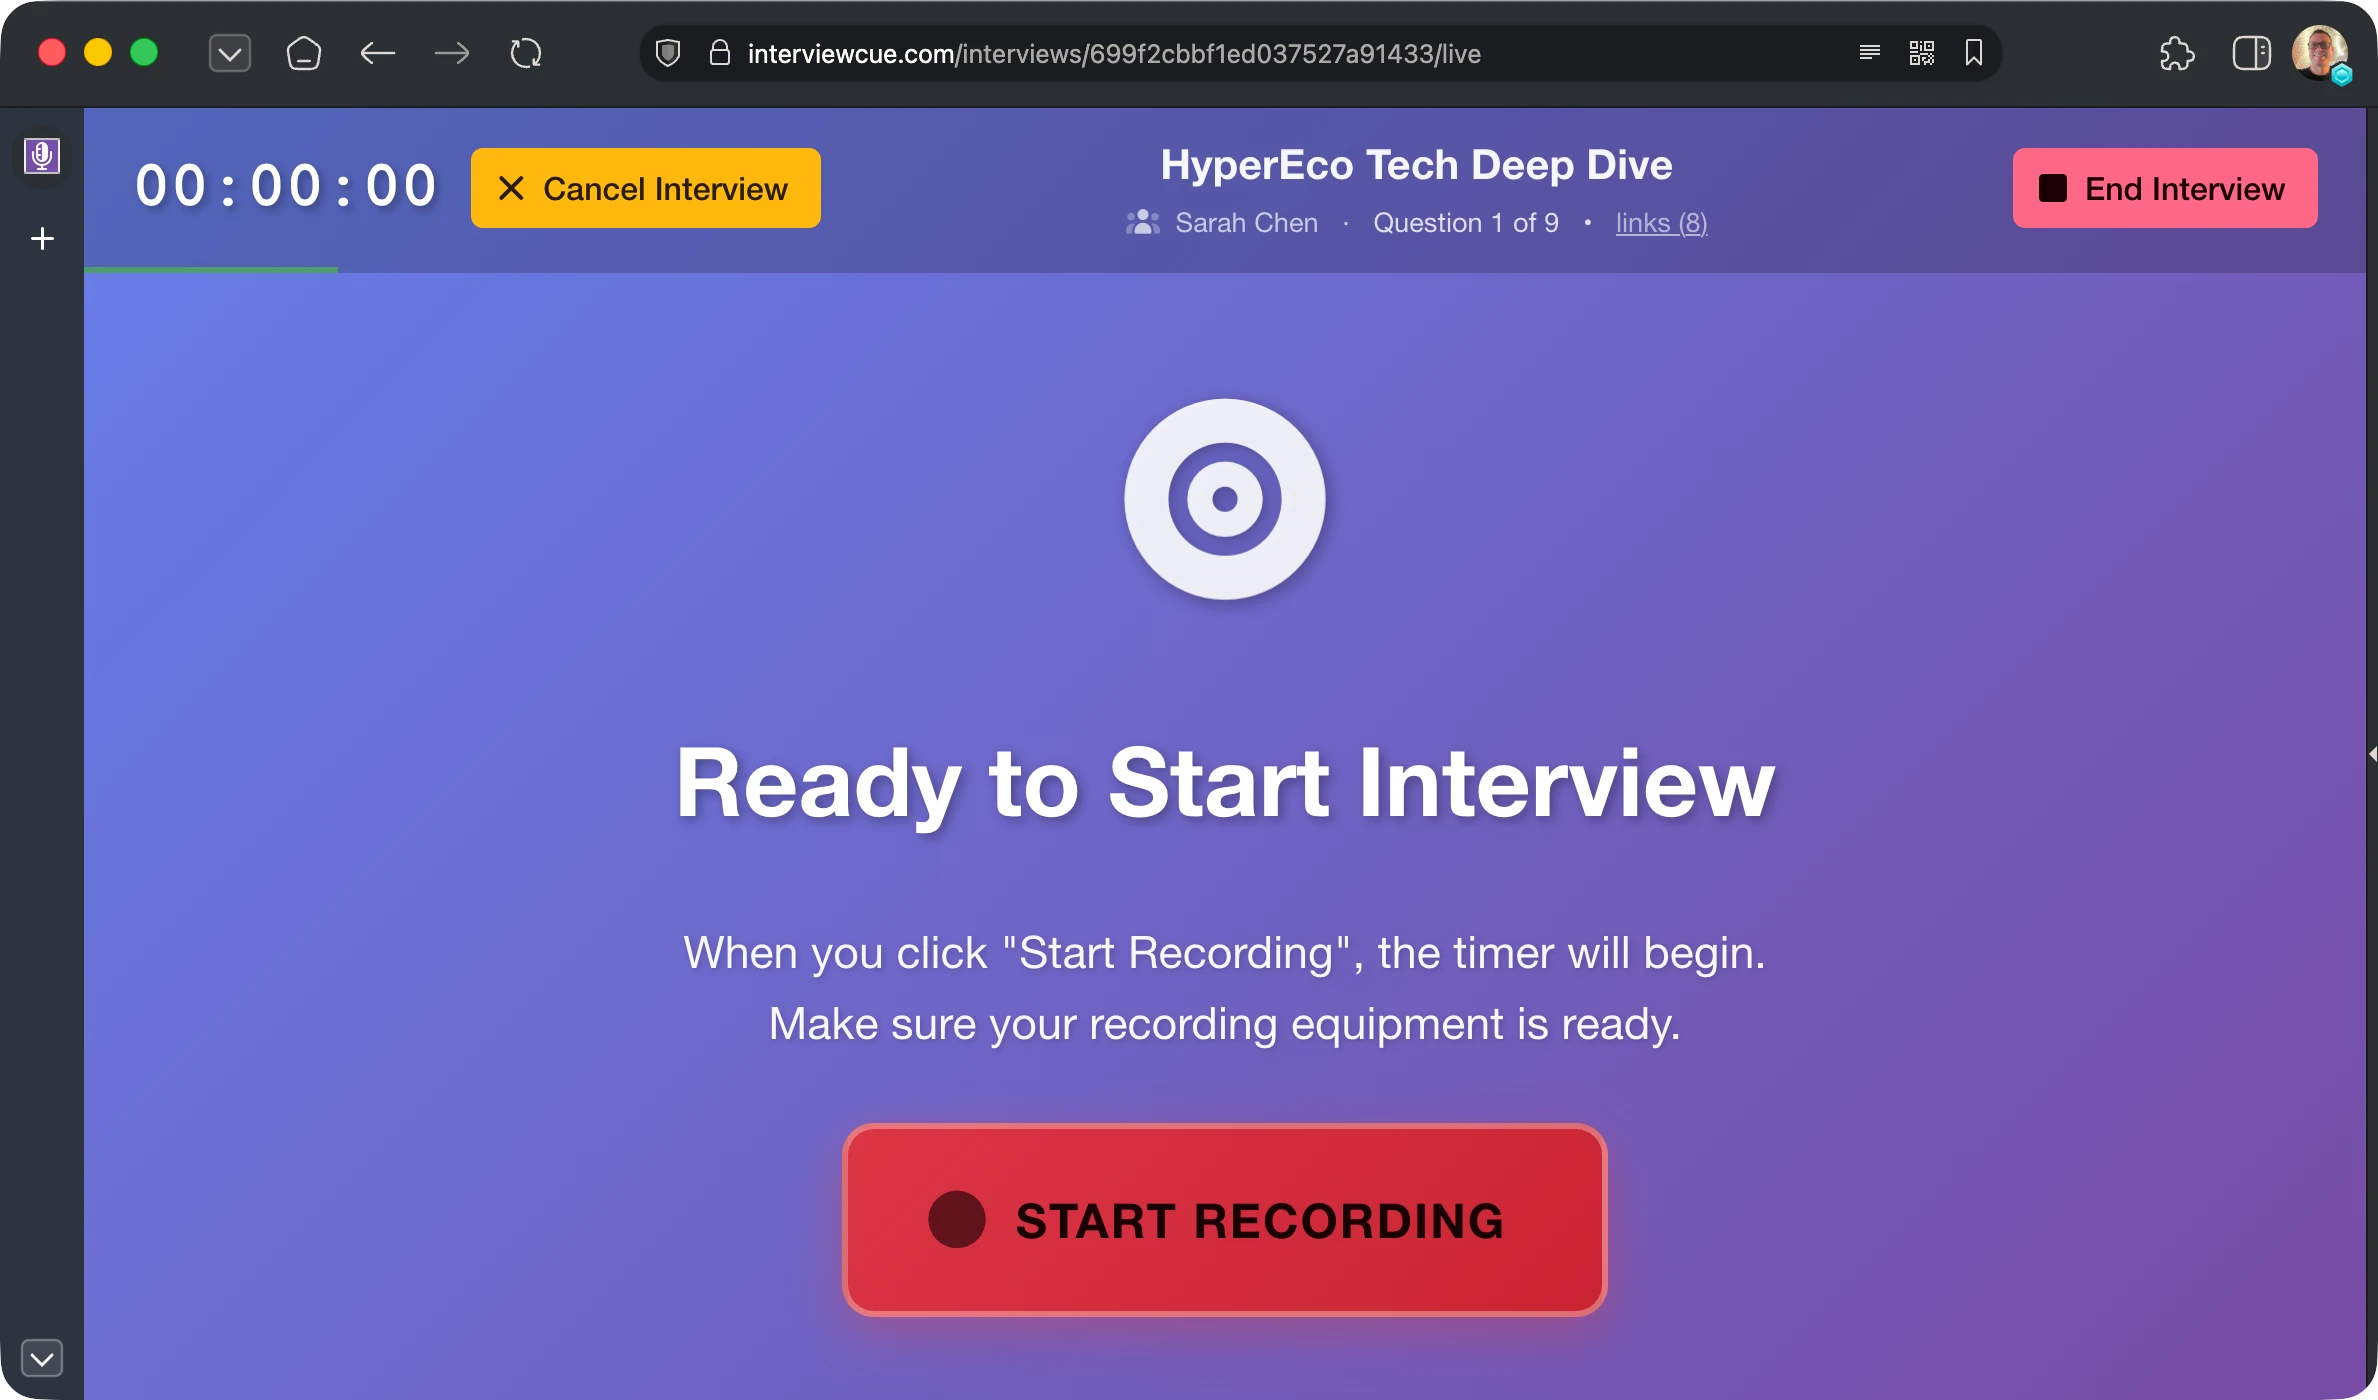
Live Mode uses a two-stage start to keep your timeline clean:
Stage 1: Start Recording
Press Start Recording at the same moment you begin recording in Zoom, Streamyard, Riverside, Zencastr, your DAW, or whatever you use to capture audio. The timer begins and a "Recording Started" event marks the start of your timeline.
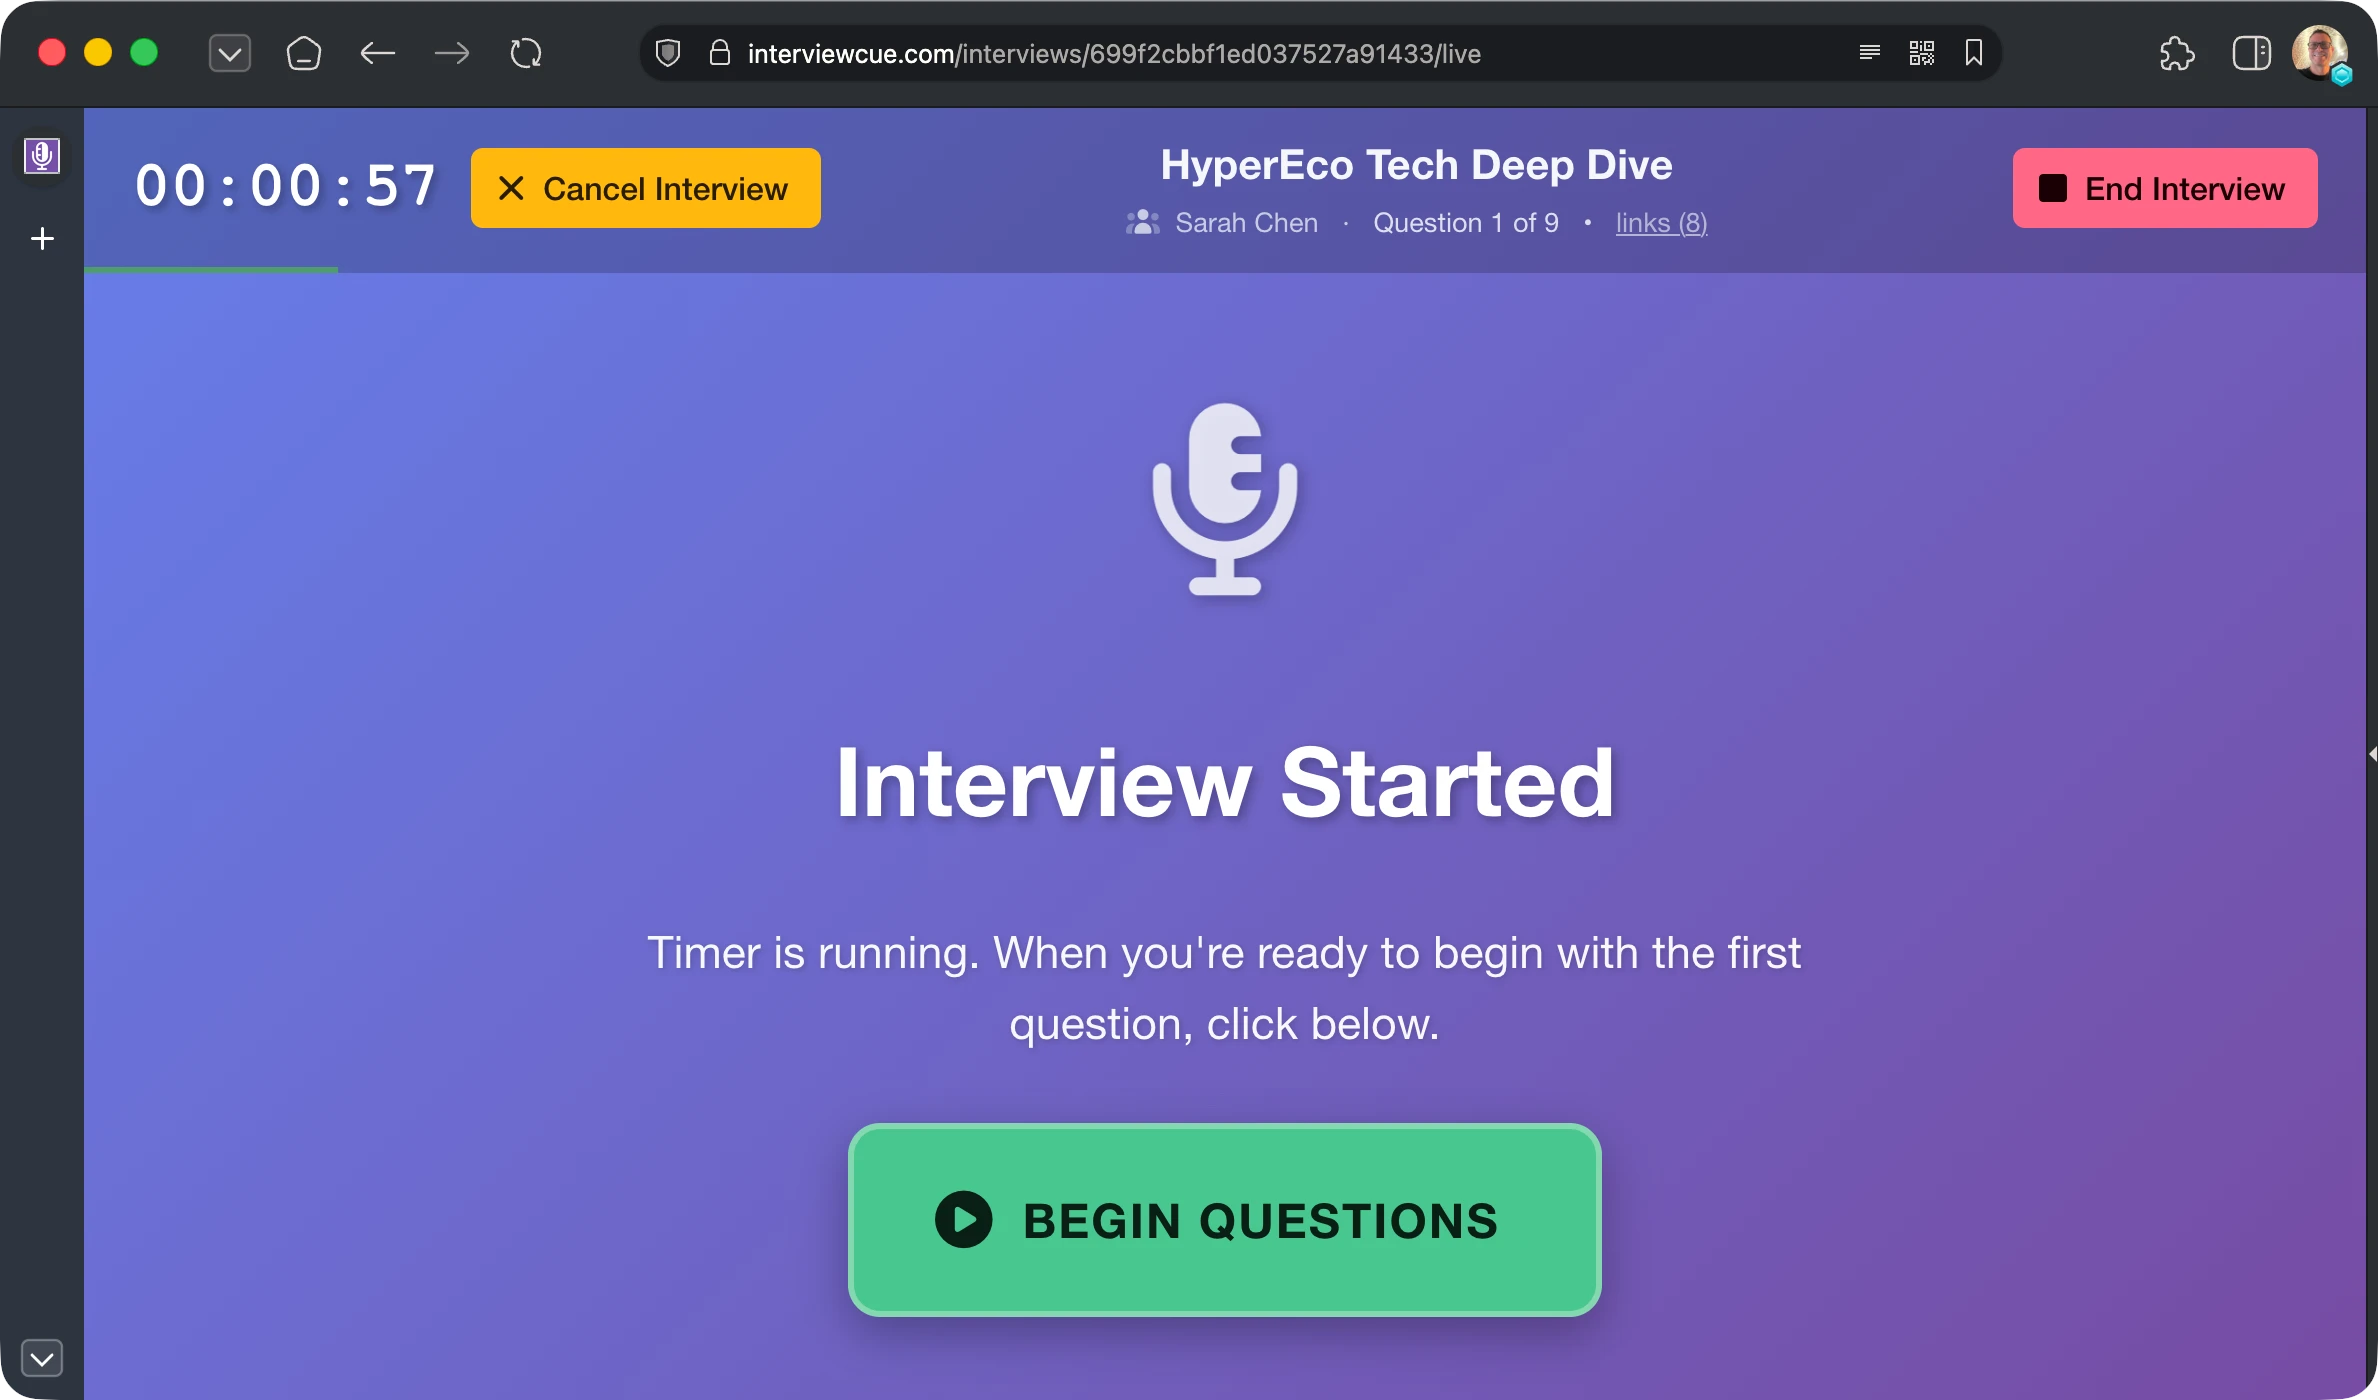
This is when you do your behind-the-scenes intro, housekeeping, and warm-up with your guest -- before diving into the actual interview.
Stage 2: Begin Questions
When you're ready to move into the actual interview, press Begin Questions. The first question appears highlighted and a "Questions Begun" event is captured with its timestamp.
Why two stages? The separation gives you a clear marker between your intro and your structured content. When you generate chapters later, the distinction between backstage warm-up and the real topics are already built in.
The Live Interface
A Scrollable Document
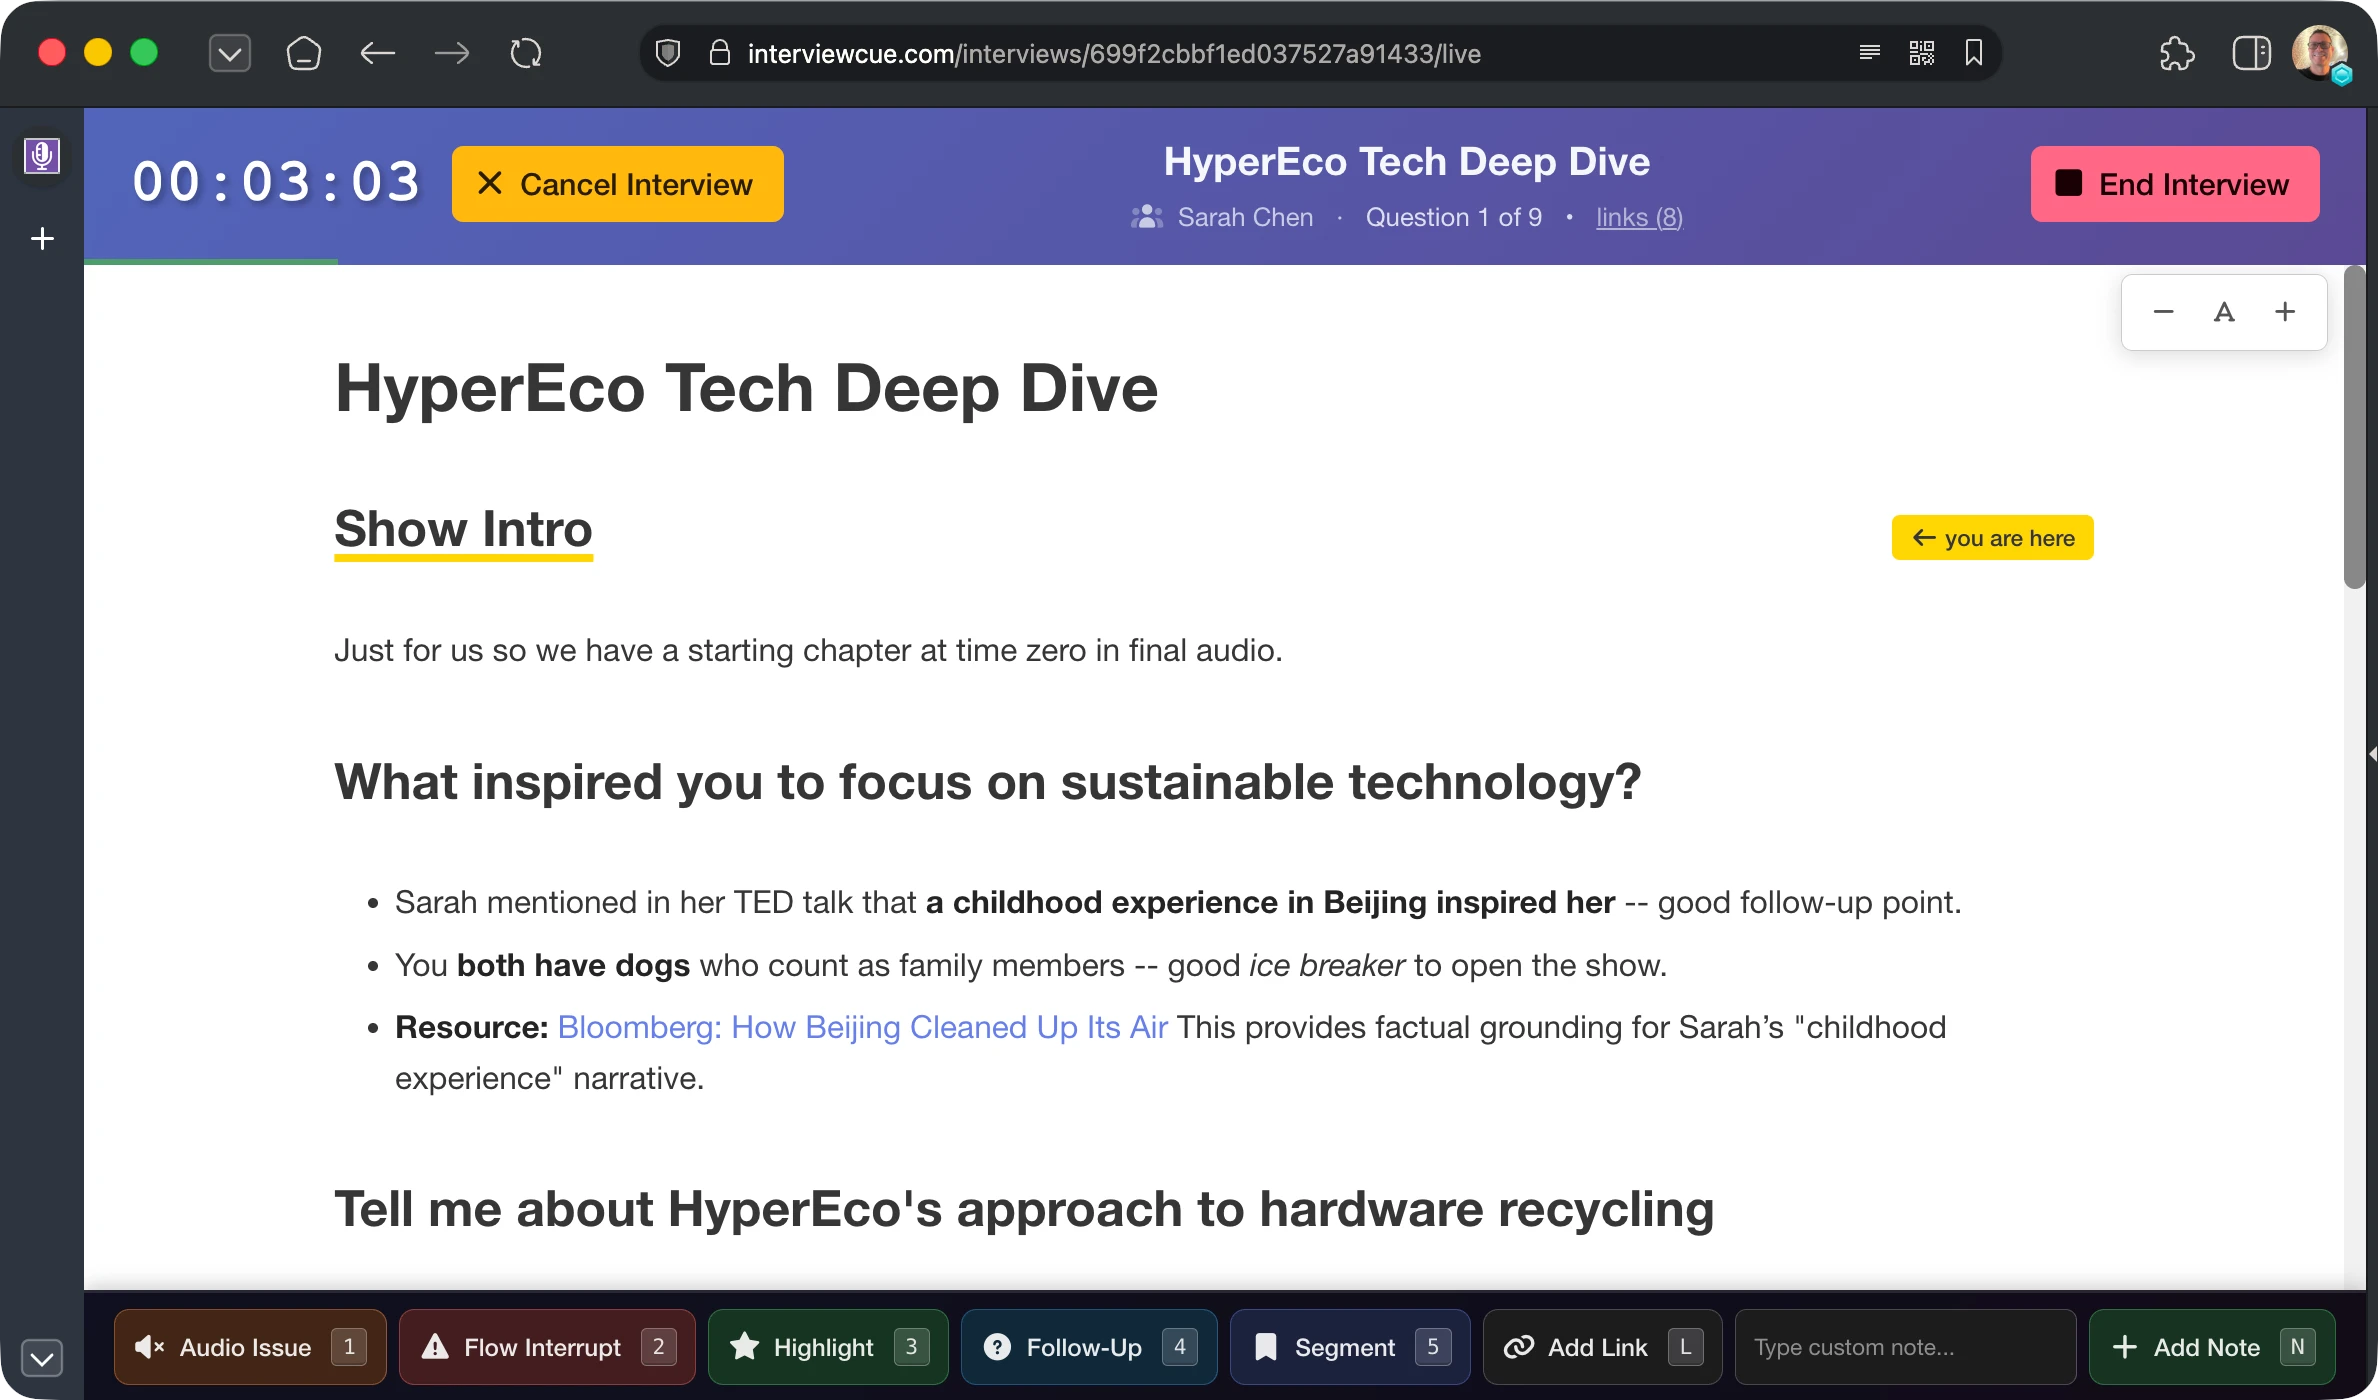
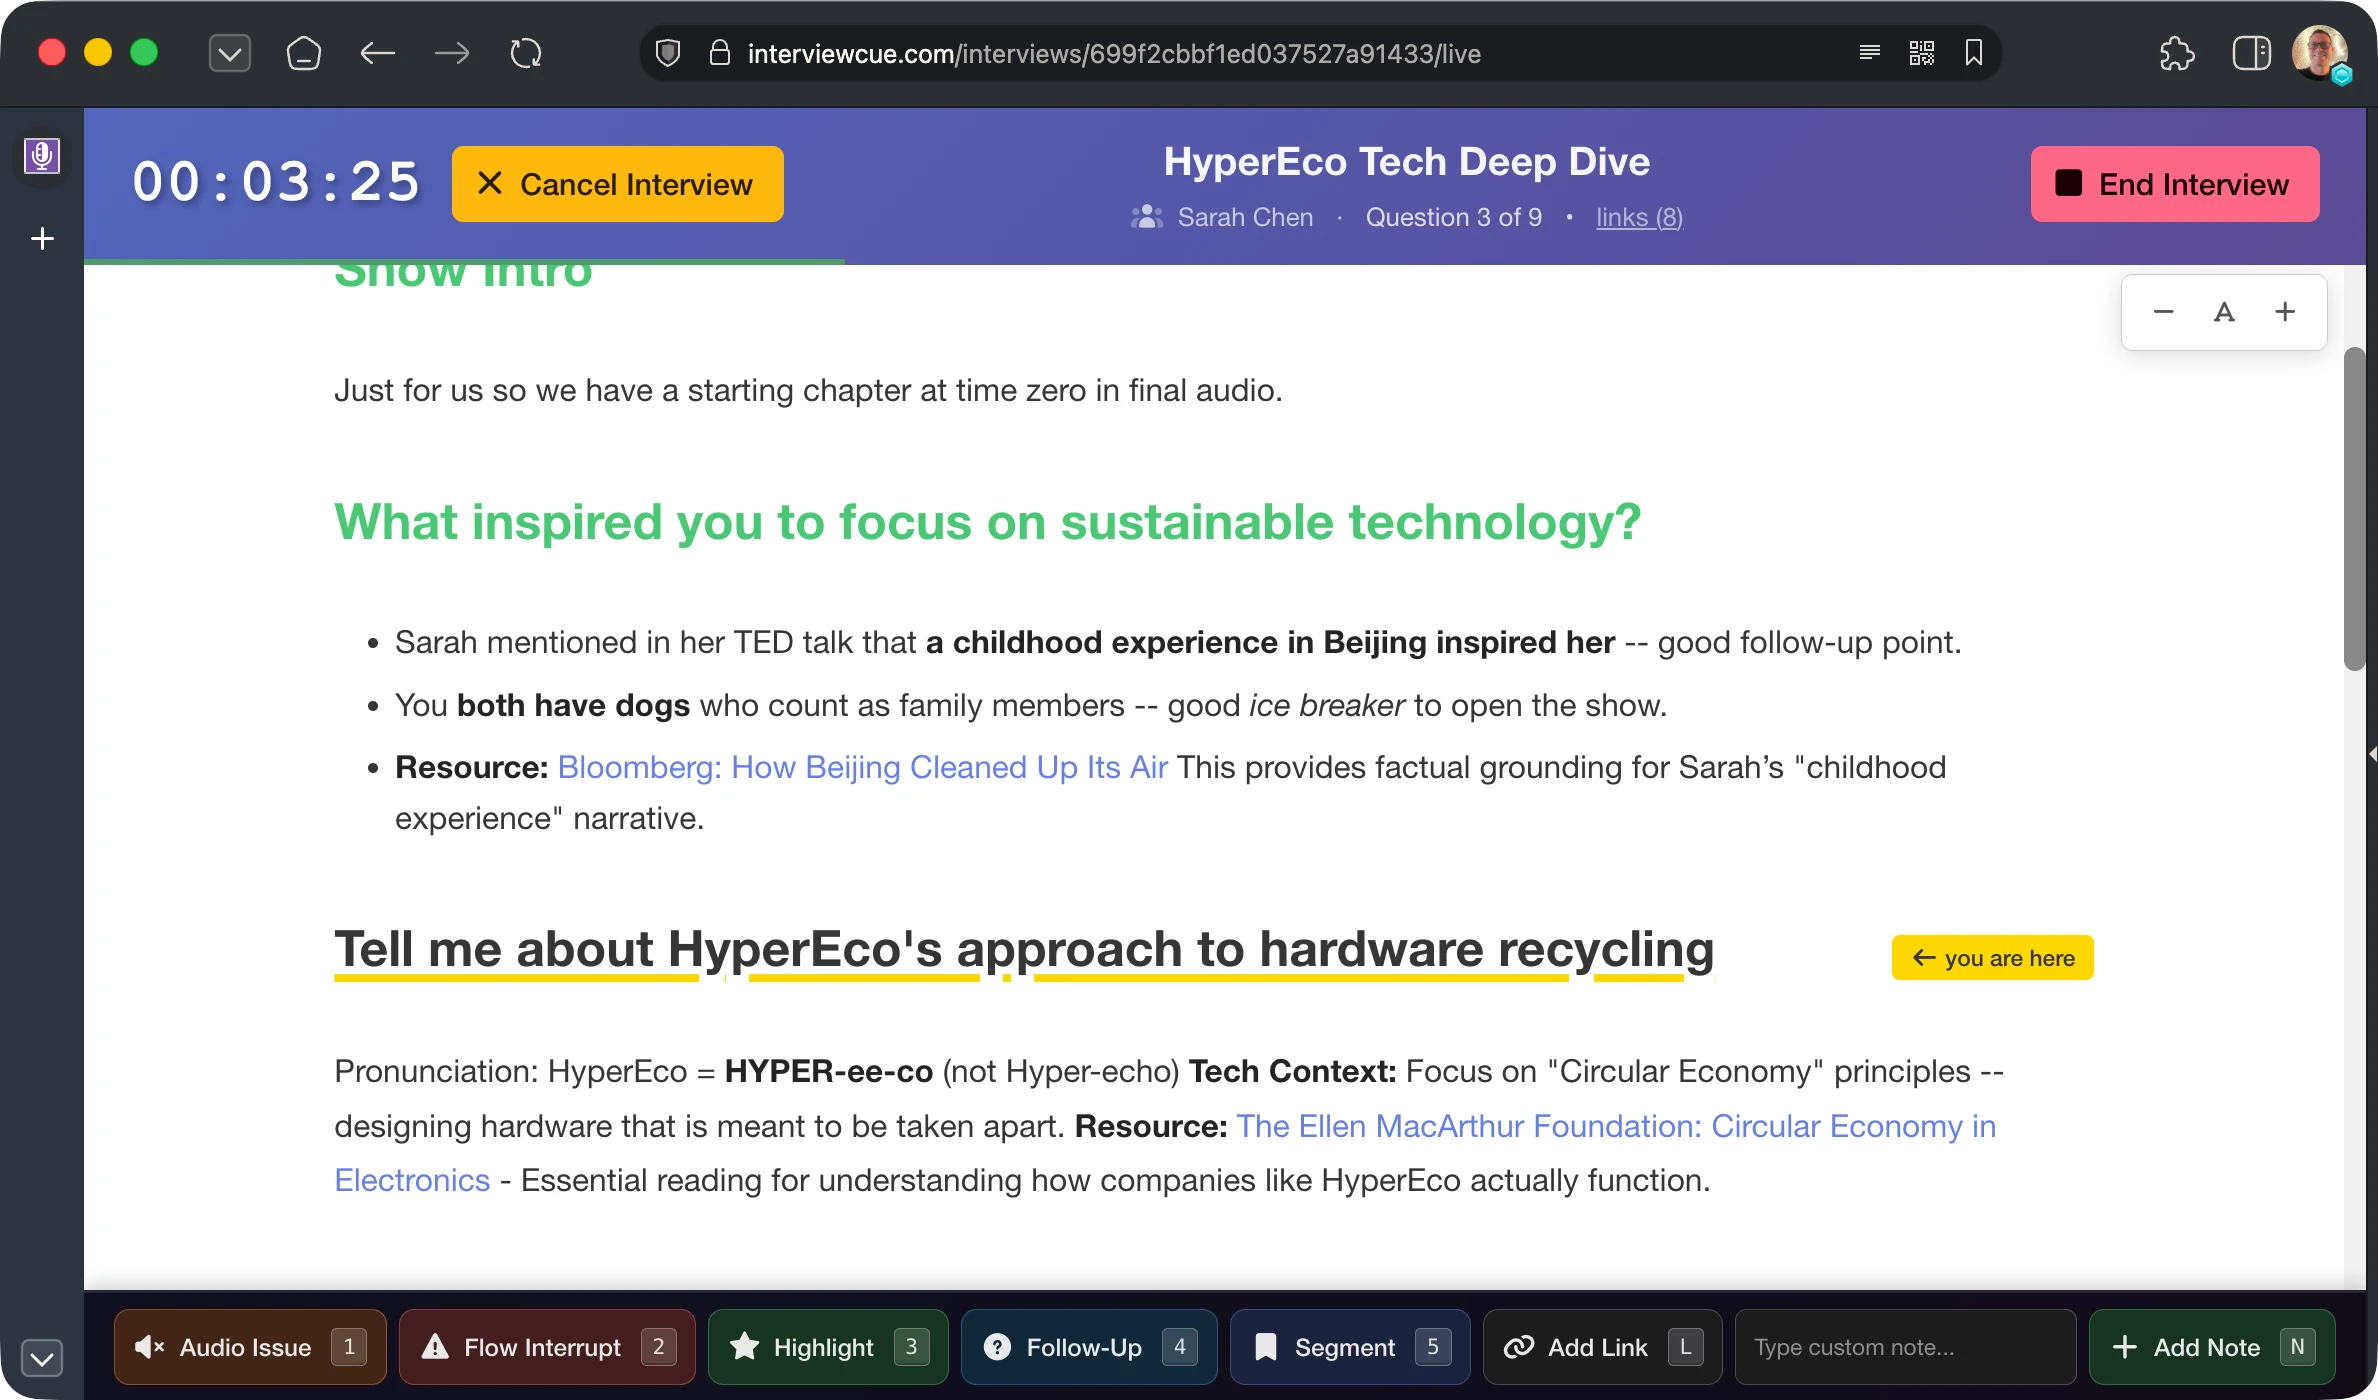
Live Mode shows your entire interview as a scrollable document -- similar to Google Docs. All questions are visible at once with their background notes beneath them in a smaller, muted font. You can scroll freely, use browser search (Cmd+F / Ctrl+F), and see the full context of your conversation at any time.
The current question is highlighted with a yellow background and a "you are here" indicator so you always know where you are. Questions you've already covered have a green title, while upcoming questions are bold black titles. A progress bar and question counter ("Question 3 of 12") at the top of the UI shows how far into the interview you are.
Navigating Questions
Click or tap any question title to jump to it. That's it -- no navigation buttons, no menus. Just click the next question when you're ready.
When you click a question:
- The timestamp is recorded for your post-production timeline
- The "you are here" indicator moves to that question
- In collaborative mode, all participants sync to the same question
Real conversations don't follow linear order -- and that's fine. If your guest mentions something you planned to cover in Question 7, just click Question 7 directly. Only that question gets marked. You can jump to any question, skip ahead, circle back, or follow tangents naturally. Your tool adapts to the conversation, not the other way around.
The Running Timer
The elapsed time is always visible at the top of the screen. It starts when you press Start Recording and runs continuously. This timer syncs with your audio timeline -- the timestamps it records become the foundation for chapter markers and edit points in post-production.
Screen Wake Lock
When you enter Live Mode, InterviewCue automatically requests a screen wake lock to keep your device awake throughout the interview. No more accidental screen sleep mid-conversation. This works on iPhone, iPad, Android, and desktop browsers (Chrome, Edge, Firefox, Brave, Vivaldi, and Safari).
Font Zoom
Adjustable text size lets you make questions and background notes comfortable to read at any distance. Whether you're glancing at a laptop on your desk or an iPad propped up across the room, you can dial in the right size.
Capturing Events with Hotkeys
The most powerful feature in Live Mode is the ability to capture timestamped events with a single keypress -- without breaking eye contact with your guest, without reaching for a mouse, without losing the thread of conversation.
The Seven Event Types
| Key | Event | When to Use |
|---|---|---|
1 |
Audio Issue | Coughs, interruptions, technical problems -- so your editor knows where to clean up |
2 |
Flow Interrupt | The conversation went off-track, got interrupted, or had an awkward transition -- mark it to smooth out in editing |
3 |
Highlight | Quotable moments, key insights, share-worthy content -- these become social clips and show note highlights |
4 |
Follow-Up | Topics to revisit, tangents to circle back to in post-production |
5 |
Segment | Cover a topic not expected in questions? Mark it as a segment for chapter conversion later |
L |
Add Link | Capture a URL your guest mentions mid-conversation -- saved and timestamped in your timeline |
N |
Add Note | Anything else -- personal reminders, show notes ideas, books or resources mentioned |
How It Works
Press a number key (1--5) and the event is captured instantly -- timestamped and saved with a brief flash of the button to confirm. No modal, no extra step. You never leave the conversation.
For L (Add Link), a dialog opens so you can paste the URL and an optional title, then press Enter to save. For N (Add Note), the cursor jumps to the custom note input at the bottom of the screen -- type your note and press Enter. Both are timestamped just like the number-key events.
Capture liberally. It's always better to have a few extra markers than to miss the moment your guest said something brilliant. Events can be edited, reclassified, or deleted in post-production -- but the timestamp of a moment that's passed is much harder to reconstruct.
Working with Links
Your reference links are accessible throughout the interview. Press L to open the Add Link dialog -- perfect for capturing URLs your guest mentions mid-conversation. The link is saved and timestamped as an event in your timeline.
At the top of the live interface, the links count link opens the Quick Reference panel showing all your links. From there you can search, copy URLs, or open links in new tabs.
For the full visual browsing experience, use the Link Opener in a separate browser window. When connected to your active session, it lets you control topic timing through Mark as Asked buttons on each tab -- so you can share reference links on screen without switching back to the live mode window. See Reference Links for the complete Link Opener workflow.
Collaborative Sessions
Live Mode supports real-time collaboration with co-hosts, producers, and guests. Enable Collaborative Mode from the interview details page before starting, and share the session code with your team.
Co-Hosts
Co-hosts see the same live interface you do -- questions, background notes, status badges -- all synchronized in real time. When the host clicks a question, every co-host's view updates. Co-hosts can capture events with hotkeys and add links, making them a full partner in the recording process.
Guests
Guests get a follow-along view that stays in sync with the host. They can see your questions and background notes (helping them stay sharp and on point), and they can add reference links when they mention a resource. Guests cannot control question navigation or capture events -- that stays with the host and co-hosts.
Producers
A producer can join the live session as a co-host and capture events as they happen -- marking highlights, flagging audio issues, and adding notes. This frees the host to focus entirely on the conversation while the producer handles the editorial capture in real time.
Practice Mode
Before a high-stakes interview, use Practice Mode to rehearse. It's the same interface as Live Mode -- same questions, same hotkeys, same layout -- but nothing is recorded or saved. Build muscle memory with the hotkeys, get comfortable with the flow, and walk into the real interview with confidence.
Launch Practice Mode from the Practice Interview button on the interview details page.
Tips for a Great Session
Before you start:
- Get your recording software ready (Zoom, Streamyard, Riverside, Zencastr). You'll want to press Start Recording in sync with recordings on these platforms
- Position your device where you can glance at it without turning away from your guest
- If using Link Opener for screen sharing, set it up in a separate browser window before starting
During the interview:
- Trust your prep -- the questions and background notes are there to guide, not constrain
- Use hotkeys, not the mouse -- muscle memory develops quickly
- Let conversations breathe -- not every moment needs a captured event
- Glance at the timer occasionally to manage your time, and keep an eye on the progress bar to see how many questions you have left
On mobile or tablet:
- InterviewCue is touch-optimized with large tap targets (48px minimum)
- iPad makes an excellent recording companion -- prop it on a stand with the screen facing you
- All questions are visible and scrollable, so you can follow along even without a keyboard for hotkeys
If something goes wrong:
- Forgot to capture a moment? Add events in post-production after the fact
- Captured the wrong event type? Edit or delete it in post-production
- Network dropped? Your questions remain visible and scrollable -- continue reviewing your prep. Actions taken while disconnected won't be saved, but you'll be notified and the session reconnects automatically once the network returns
- Interview running long? Skip less important questions and jump to your wrap-up
What's Next?
After your interview, it's time for post-production:
Post-Production Timeline - Review captured events, fine-tune timestamps, and export your timeline
Export Formats - Chapter markers, EDL, CSV, and more for your editing workflow
Collaborative Live Mode - Deep dive into multi-host and guest collaboration
Your First Interview - See the complete journey from idea to published episode